There I was, standing in the middle of my kitchen, a mound of melted chocolate and a handful of pretzels staring back at me like a culinary challenge I didn’t know I was ready for. The heat of the stove hissed, and the sweet, buttery aroma of caramel drifted through the air, making my taste buds dance even before I had a single bite. I had promised myself a dessert that would wow my friends, but every recipe I’d found felt either too bland or too complicated. So I decided to throw caution to the wind and mix everything I could get my hands on into one glorious, no‑bake masterpiece.
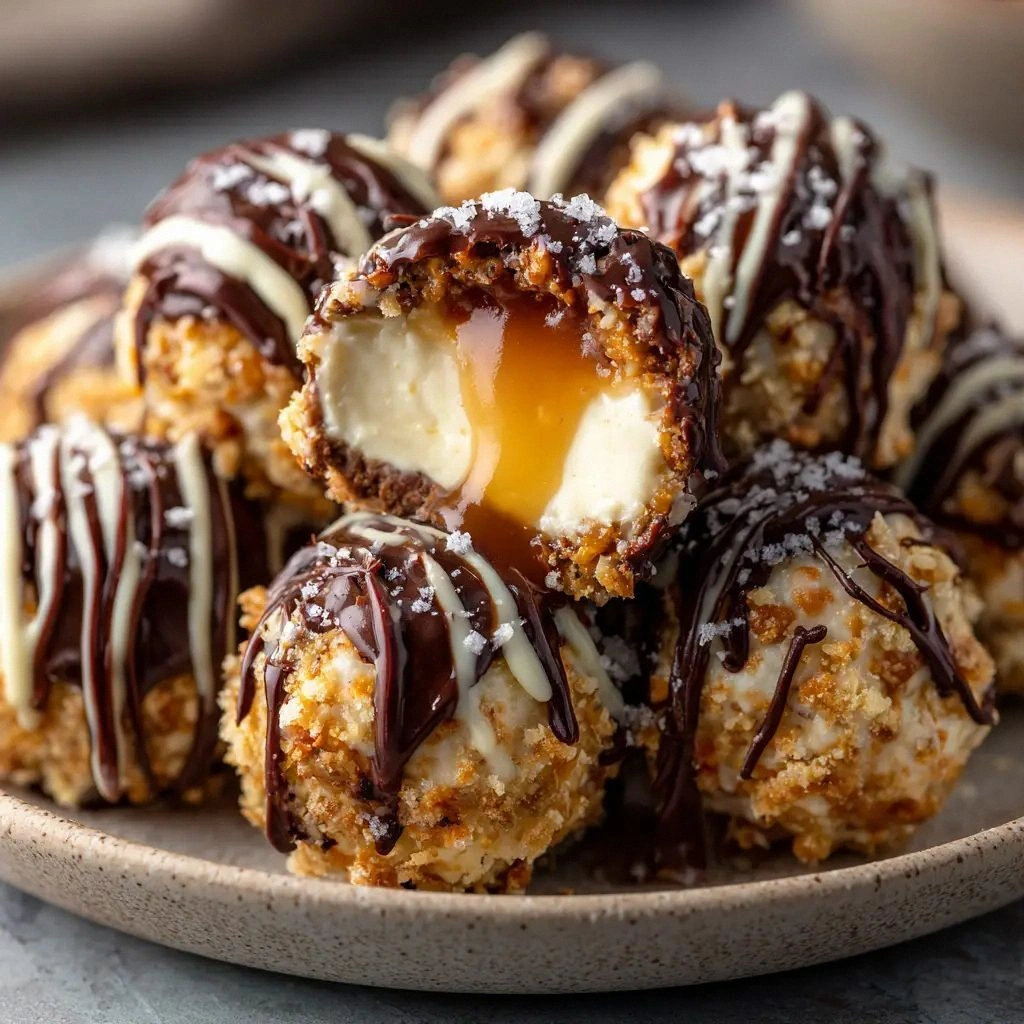
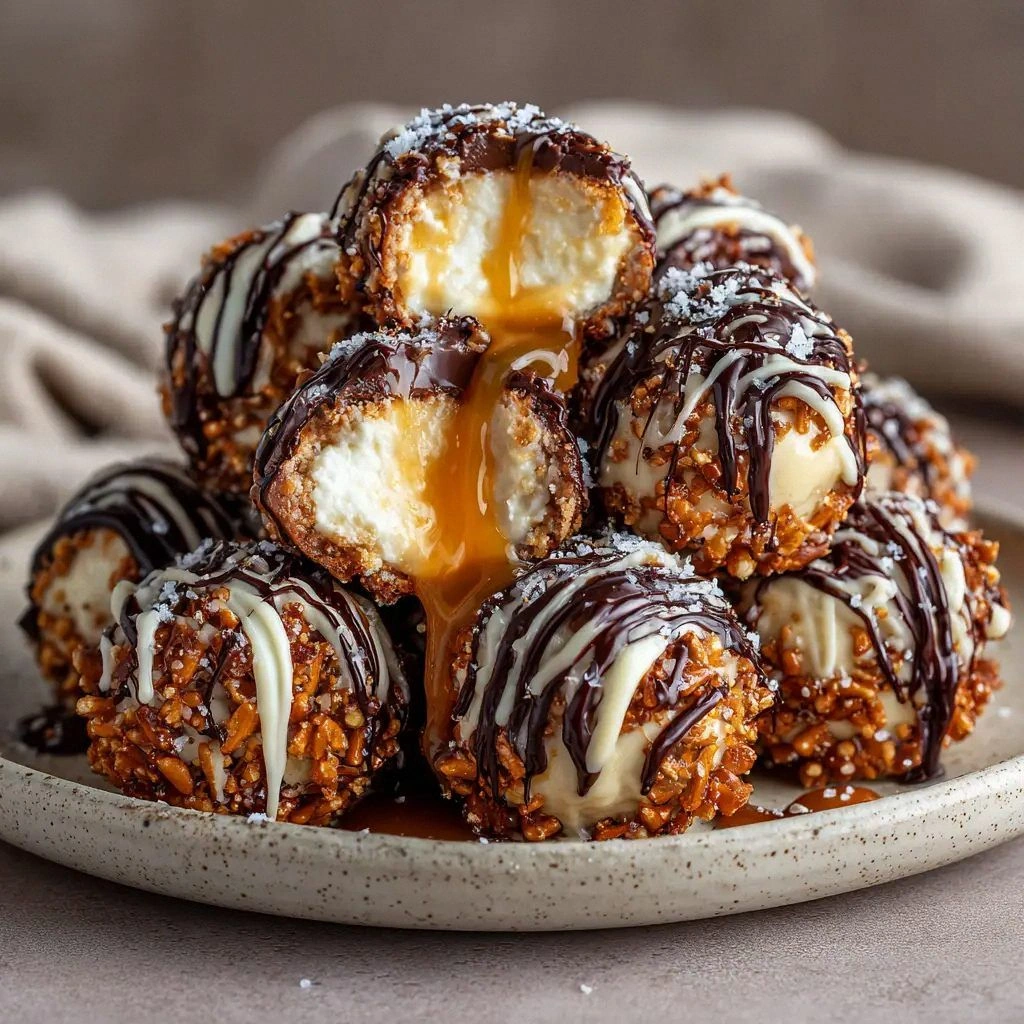
Picture this: the first spoonful of the creamy, caramel‑infused filling, silky as a velvet curtain, with a subtle crunch of pretzel shards that crackle like thin ice. The salty sea salt glints on the surface, catching the light in a way that makes every bite feel like a secret indulgence. The room fills with the warm, comforting scent of melted cream cheese and caramel, and you can hear your friends’ excited chatter as they line up for the first taste. I dare you to taste this and not go back for seconds; it’s that addictive. And I’ve got to confess—before anyone else got to try it, I ate half the batch myself.
What sets this recipe apart isn’t just the bold combination of flavors—it’s the way each element works in harmony. The pretzels aren’t merely a garnish; they’re a structural backbone that gives the cheesecake ball a satisfying bite that contrasts with the smooth, gooey interior. The caramel isn’t just sweet; it’s a buttery, almost metallic glaze that coats the ball like a glossy coat of lacquer. The sea salt isn’t a mere seasoning; it’s the secret that pulls the sweetness into a deeper, richer place. Most recipes get this completely wrong, but here’s what actually works: a no‑bake approach that preserves the integrity of each component.
And here’s the twist that will make your mouth water even before you take a bite: a simple, quick step that transforms ordinary pretzels into a crunchy, caramel‑infused coating that sets in a matter of minutes. I’ve spent hours perfecting this step, and it’s the reason why the texture feels so balanced. Picture yourself pulling these out of the fridge, the whole kitchen smelling incredible, and seeing your friends’ eyes widen as they take their first bite. The anticipation alone is worth the effort.
Let me walk you through every single step—by the end, you’ll wonder how you ever made it any other way. Trust me, this is hands down the best version you’ll ever make at home, and it’s easier than you think. So grab your mixing bowl, your pretzels, and let’s get started.
What Makes This Version Stand Out
- Flavor Fusion: The marriage of sweet caramel and salty pretzels creates a flavor profile that is both familiar and utterly surprising. The caramel’s buttery richness cuts through the saltiness, resulting in a balanced bite that keeps you coming back for more.
- Texture Play: The chewy center of the cheesecake contrasts with the crisp pretzel coating, giving you a delightful crunch that breaks the monotony of pure creaminess.
- Zero Baking: By skipping the oven, you preserve the silky texture of the cream cheese filling while still achieving a firm, satisfying exterior.
- Make‑Ahead Friendly: These balls can be prepared up to 24 hours ahead, allowing you to focus on other parts of your party or event.
- Showstopper Appeal: The glossy caramel glaze and crunchy pretzel topping make for a visually stunning dessert that impresses even the most discerning guests.
- Ingredient Quality: Using premium cream cheese and real soft caramels elevates the entire experience, ensuring that every bite is indulgently rich.
- Adaptability: Swap out pretzels for chocolate chips or nuts for a completely different flavor adventure—this recipe is a playground.
- Time Efficiency: With just 45 minutes from start to finish, you can create a dessert that feels luxurious without the time commitment of traditional baked treats.
Inside the Ingredient List
The Flavor Base
At the heart of these cheesecake balls lies the creamy, luscious cream cheese. It’s the foundation that holds everything together and provides that classic cheesecake tang. When you soften it to room temperature, it becomes silky, allowing the powdered sugar and vanilla to dissolve seamlessly. Skipping the cream cheese would leave you with a bland, sugary mixture that lacks depth. If you’re looking for a dairy‑free alternative, try a plant‑based cream cheese that has a similar fat content to keep the texture rich.
The Texture Crew
Soft caramels are the secret to that buttery, melt‑in‑your-mouth experience. They’re not just sweet; they’re slightly chewy, which adds a pleasant contrast to the smooth cream cheese. The pretzels, on the other hand, bring the crunch factor—think of them as the crispy armor that protects the delicate interior. If you can’t find soft caramels, a small amount of honey or maple syrup can mimic the caramel’s viscosity, but the flavor profile will shift slightly. For a crunchier bite, consider adding a handful of crushed pretzels to the filling itself.
The Unexpected Star
Heavy cream is the unsung hero that ties the filling together, giving it a glossy sheen and a silky mouthfeel. It also helps the powdered sugar dissolve completely, preventing any gritty texture. If you’re aiming for a lower‑fat version, a splash of coconut milk can replace the heavy cream, though the final product will be a touch lighter. The sea salt isn’t just for seasoning; it’s the counterbalance that elevates the caramel’s sweetness and enhances the pretzels’ flavor.
The Final Flourish
The 1 cup of pretzels used for coating is the finishing touch that turns an ordinary dessert into a showstopper. When you roll the balls in the pretzels after they’ve set, you create a caramelized crust that’s both visually appealing and texturally exciting. If you’re feeling adventurous, sprinkle a pinch of smoked sea salt on top for an extra layer of complexity. Always use lightly salted pretzels to avoid an overly salty bite.
Everything’s prepped? Good. Let’s get into the real action.
The Method — Step by Step
- Begin by bringing the cream cheese to room temperature—this makes it easier to blend. In a medium bowl, beat the softened cream cheese until it’s smooth and fluffy, like a cloud. Add the powdered sugar gradually, whisking constantly to avoid any lumps. Once the mixture is silky, stir in the vanilla extract until the aroma fills the kitchen. The mixture should be thick but spreadable; if it’s too runny, chill it for a few minutes and try again.
- Melt the soft caramels in a saucepan over low heat, stirring until they’re completely liquid. This step is crucial—if the caramels burn, the flavor becomes bitter. Once melted, let the caramel cool slightly so it doesn’t scorch the cream cheese when combined. Pour the warm caramel into the cream cheese mixture and fold gently until fully incorporated. The filling should have a glossy sheen, indicating the caramel is evenly distributed.
- Add the heavy cream to the mixture, whisking until the texture is smooth and slightly loose. This will help the mixture set into a firm yet creamy consistency. At this point, the filling is ready to be portioned. Use a small cookie scoop or a tablespoon to form uniform balls; consistency is key for even setting.
- Place the formed balls on a parchment‑lined tray and refrigerate for 30 minutes, or until they’re firm enough to handle. The chilling step is the secret to a stable, bite‑size cheesecake that won’t crumble. While they’re setting, prepare the pretzel coating by crushing the pretzels in a food processor until they’re fine crumbs. The texture of the crumbs should be similar to coarse sand.
- Once the balls are set, remove them from the fridge and roll each one in the crushed pretzels, pressing lightly to ensure the coating adheres. The pretzel coating should be thick enough to give a satisfying crunch but not so thick that it overwhelms the filling. Keep the coated balls on a parchment sheet, and place them back in the fridge for an additional 15 minutes to set the coating.
- For the finishing touch, melt a small amount of caramel in a microwave or double boiler. Use a brush to lightly coat the tops of the pretzel‑coated balls, giving them a glossy, caramelized finish. The glaze should be thin, allowing the pretzel crunch to show through. This step adds a subtle caramel sheen that makes the dessert look professionally plated.
- Let the balls chill for another 10 minutes to set the caramel glaze. During this time, the flavors will meld, creating a harmonious balance of sweet, salty, and creamy. When you take the first bite, you’ll notice the caramel coating giving way to a soft, creamy center.
- Serve immediately, or store in an airtight container in the refrigerator for up to 48 hours. If you’re planning a gathering, set them out on a platter just before serving to keep the pretzel coating crisp. For a dramatic presentation, drizzle a little extra caramel on top or sprinkle with sea salt flakes.
- Enjoy the moment—watch your friends’ faces light up as they savor the perfect balance of textures and flavors. Remember, the secret to this dessert’s success lies in the precise timing and the quality of ingredients. And if you want to impress even further, add a dash of espresso powder to the filling for a subtle mocha twist.
That’s it — you did it. But hold on, I’ve got a few more tricks that will take this to another level.
Insider Tricks for Flawless Results
The Temperature Rule Nobody Follows
Temperature is everything when it comes to cream cheese. If it’s too cold, it won’t blend smoothly; if it’s too warm, the mixture will become runny and won’t set. I’ve learned to let the cream cheese sit at room temperature for at least an hour before starting. This simple step eliminates the need for a whisk and guarantees a silky texture. A friend tried skipping this step and ended up with a lumpy mess that never set properly.
Why Your Nose Knows Best
Don’t ignore the aroma of the caramel as it melts. A faint, buttery scent is a sign that the caramel is at the right consistency. If it smells burnt, pull it off the heat immediately. A burnt caramel can ruin the entire flavor profile. I’ve found that a quick sniff can save you from a batch of bitter caramels.
The 5-Minute Rest That Changes Everything
After you’ve formed the balls, let them rest in the fridge for exactly 30 minutes before coating them. This brief pause allows the filling to firm up, preventing the pretzel coating from sinking into the center. I once rushed this step and the balls collapsed, but now I always stick to the timing. The result is a perfectly firm ball with a crisp exterior.
Keep the Pretzels Fresh
Use freshly purchased pretzels for the best crunch. Stale pretzels will lose their bite and give a flat, unremarkable texture. If you have leftovers, store them in an airtight container to maintain their crispness. I’ve also experimented with lightly salted pretzels versus unsalted; the salted version gives a more balanced flavor.
Don’t Forget the Sea Salt Finish
A light dusting of sea salt on top of the caramel glaze elevates the flavor profile by adding a subtle briny note that contrasts with the sweetness. Sprinkle it just before serving to keep the salt from dissolving into the glaze. I’ve found that a pinch of flaky sea salt is the secret to a gourmet finish.
Creative Twists and Variations
This recipe is a playground. Here are some of my favorite ways to switch things up:
Chocolate Pretzel Crunch
Swap the regular pretzels for chocolate‑covered pretzels or crushed chocolate chips. The result is a decadent chocolate twist that pairs beautifully with the caramel. This variation is perfect for chocolate lovers and makes for a stunning presentation when sprinkled with cocoa powder.
Nutty Caramel Swirl
Add a handful of chopped almonds or pecans to the filling before forming the balls. The nuts provide a delightful crunch and a nutty undertone that complements the caramel’s sweetness. It’s a great option for guests who enjoy a bit of texture in their desserts.
Spiced Caramel Explosion
Infuse the caramel with a pinch of cinnamon, nutmeg, or cayenne pepper for a warm, spicy kick. The spices add depth and complexity, turning the simple cheesecake ball into an exotic treat. Serve it with a drizzle of extra caramel for an extra layer of flavor.
Mocha Madness
Stir a teaspoon of instant espresso powder into the filling for a subtle coffee flavor. The mocha note pairs wonderfully with the caramel and pretzel, creating a sophisticated dessert that’s perfect for after‑dinner sipping.
Mini Cheesecake Bites
Use a mini muffin tin to create smaller, bite‑size versions of the balls. This is ideal for parties or for those who want a quick, sweet snack. The mini version also allows you to experiment with different fillings, such as lemon curd or raspberry jam.
Seasonal Citrus Twist
Incorporate a splash of lemon or orange zest into the filling for a bright, citrusy contrast. The acidity cuts through the richness, providing a fresh finish that’s especially welcome during warmer months. A drizzle of citrus glaze on top adds a visual pop.
Storing and Bringing It Back to Life
Fridge Storage
Keep the cheesecake balls in an airtight container in the refrigerator for up to 48 hours. The pretzel coating remains crisp, and the filling stays creamy. If you notice the glaze drying out, simply brush it with a thin layer of melted caramel before serving.
Freezer Friendly
For longer storage, freeze the balls in a single layer on a parchment‑lined tray, then transfer them to a freezer bag. They’ll stay good for up to 2 weeks. Thaw in the refrigerator overnight before serving to preserve the texture.
Best Reheating Method
To revive the cheesecake balls, place them in the microwave on high for 10–15 seconds. If you prefer a warmer center, heat them in a preheated 350°F oven for 5 minutes. Add a tiny splash of water before reheating to create steam, which keeps the filling moist and silky.