Picture this: a sizzling skillet, the aroma of cumin and garlic dancing through the kitchen, and a friend daring you to taste this and not go back for seconds. I was standing in my cramped apartment, watching a pot of plain chicken stew bubble away, feeling the disappointment of a dinner that had gone stale. The clock ticked, and my stomach growled louder than the kettle. That moment sparked a culinary rebellion: I wanted something that could turn an ordinary night into a fiesta, something that would make the walls echo with laughter and the fridge feel like a treasure chest of flavors. I dove into my pantry, pulled out a handful of beans, and decided to give a classic white chicken chili a taco twist. The result? A dish that feels like a warm hug in a tortilla, with a creamy, spicy kick that coats your tongue like velvet and leaves you craving a second bite.
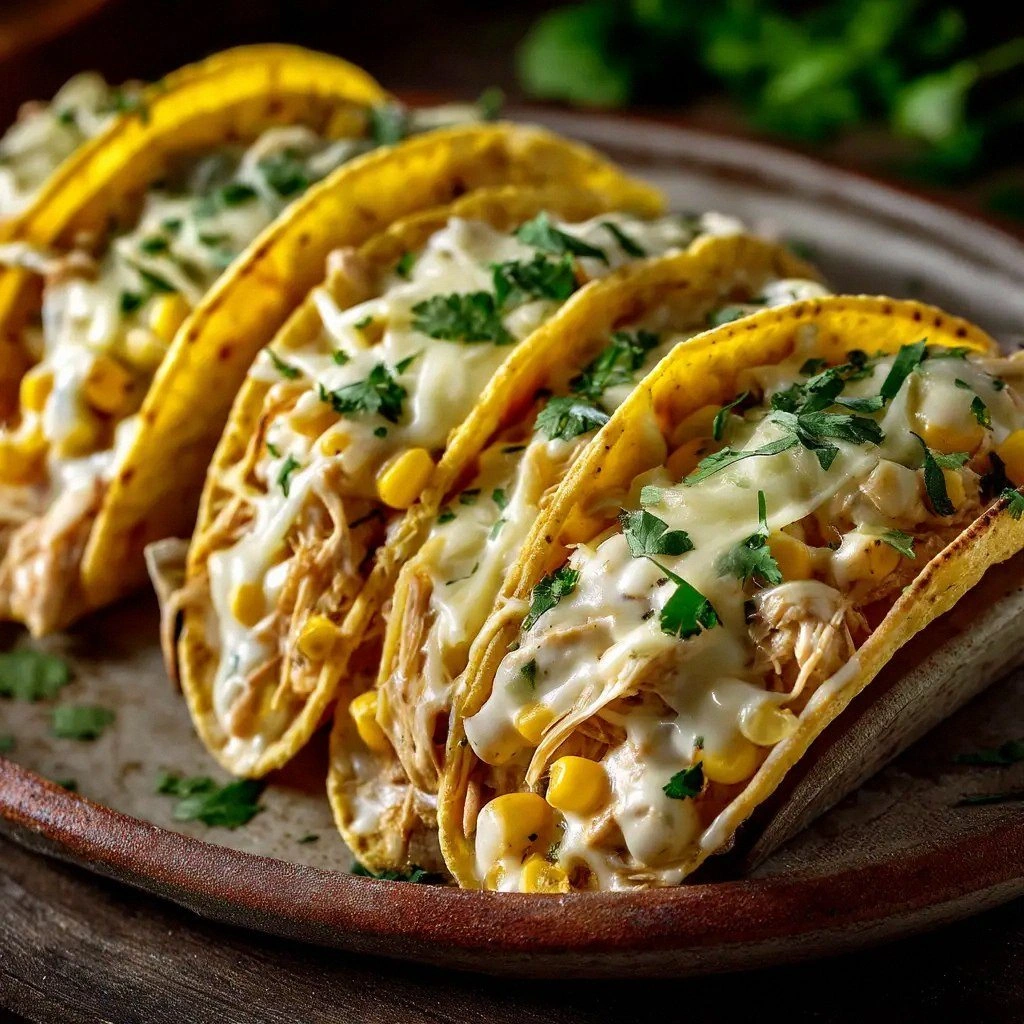
The first time I tasted it, the crunch of the tortilla hit the palate with a satisfying snap, the heat from the green chiles kissed my tongue, and the cream cheese melted into a silky sauce that clung to the chicken and beans. The sound of the chili bubbling was a comforting lullaby, and the scent of roasted cumin made my senses sing. I could almost hear the clink of a margarita glass in the background, though I was eating it solo. The texture was a delightful contrast: the soft, shredded chicken against the firm, yet pliable tortilla, and the beans providing a hearty bite that didn’t overwhelm the sauce. The bright green chiles added a pop of color, making the dish look as vibrant as it tasted. And the best part? Every bite was a revelation of layers—spicy, creamy, tangy, and a hint of citrus from the lime that I’d squeeze on top.
What makes this version stand out is not just the combination of ingredients but the way they’re orchestrated. I’ve taken the humble white chicken chili and elevated it into a taco that’s both comforting and adventurous. The creamy sauce is made with cream cheese, which gives it a luxurious mouthfeel that you rarely find in traditional chili. The beans are rinsed and drained, preventing that mushy texture most people dread. I’ve added diced green chiles for a subtle heat that’s not overpowering, and a splash of lime to cut through the richness. The tortillas are warmed just enough to be pliable, ensuring they hold the filling without tearing. All these elements come together to create a taco that feels like a gourmet experience without the fuss of a high-end restaurant.
Now, here’s the kicker: I’ve discovered that using a small amount of olive oil not only enhances the flavor but also helps the spices adhere better to the onions and garlic, creating a depth of taste that’s hard to replicate otherwise. If you’re ready to elevate your taco game, let me walk you through every single step—by the end, you’ll wonder how you ever made it any other way.
What Makes This Version Stand Out
- Flavor Fusion: The combination of cumin, chili powder, and oregano creates a harmonious base that’s both earthy and aromatic, setting the stage for the creamy sauce.
- Creamy Texture: Cream cheese melts into a silky sauce that coats the chicken and beans, giving each bite a luxurious mouthfeel.
- Balanced Heat: Diced green chiles provide a gentle, lingering heat that doesn’t overpower the dish, making it approachable for all palates.
- Texture Contrast: The crunch of the tortilla against the tender chicken and beans creates a delightful sensory experience.
- Time Efficiency: With a prep time of just 15 minutes and a cook time of 30 minutes, this recipe is perfect for busy weeknights.
- Ingredient Quality: Using Great Northern beans and fresh chicken ensures a wholesome, satisfying dish that’s as nutritious as it is delicious.
- Make‑Ahead Friendly: The chili can be prepared a day ahead, allowing flavors to meld and the sauce to thicken.
- Versatile Toppings: Optional cilantro, avocado, cotija cheese, lime wedges, and jalapeños let you customize each taco to your mood.
Alright, let's break down exactly what goes into this masterpiece...
Inside the Ingredient List
The Flavor Base
The foundation of this chili starts with olive oil, which provides a subtle richness and helps the spices adhere to the onions and garlic. Olive oil also acts as a carrier for the cumin, chili powder, and oregano, allowing their aromas to bloom fully. If you’re watching calories, a teaspoon of oil is enough to unlock the flavors without adding bulk. Skipping the oil would make the sautéing process less efficient and could result in a less cohesive sauce.
Next comes the diced yellow onion and minced garlic—two aromatics that form the backbone of any savory dish. The onion’s natural sweetness balances the heat from the chiles, while garlic adds depth and a slight pungency. If you’re in a hurry, a finely chopped onion will cook faster, but the diced version offers a pleasant bite. The onions should become translucent and slightly caramelized, which signals that they’re ready to mingle with the spices.
The Texture Crew
Shredded cooked chicken provides the protein punch and a tender texture that absorbs the sauce. I recommend using rotisserie chicken for convenience; its seasoned meat adds an extra layer of flavor. The Great Northern beans contribute a hearty bite and a mild, nutty flavor that complements the cream cheese. Rinse and drain the beans to reduce excess sodium and achieve a cleaner taste. If you prefer a thicker chili, you can mash a few beans against the back of a spoon.
Diced green chiles bring a gentle heat and a bright, green pop of color. Their mild spice profile is perfect for those who want a kick without overwhelming the dish. If you’re a heat lover, you can add a pinch of crushed red pepper flakes for an extra burst. The chicken broth acts as the liquid base, ensuring the chili remains moist and the sauce doesn’t become too thick. A splash of broth also helps to blend the cream cheese into a smooth, cohesive sauce.
The Unexpected Star
Cream cheese is the secret weapon that transforms this chili into a silky, indulgent sauce. It melts beautifully, creating a velvety coating that clings to the chicken and beans. The cream cheese also balances the acidity of the lime and the heat of the chiles, resulting in a harmonious flavor profile. If you’re vegan or lactose intolerant, a dairy-free cream cheese alternative works, but the texture may differ slightly. Using a full-fat version yields the richest, most luxurious sauce.
The Final Flourish
Flour or corn tortillas serve as the vessel that holds the chili together. Warm them gently on a skillet or in the microwave until pliable; this prevents them from breaking when you fold them around the filling. The choice between flour or corn depends on your texture preference—flour tortillas offer a soft, buttery feel, while corn tortillas provide a subtle corn flavor and a firmer bite. Optional toppings like cilantro, diced avocado, cotija cheese, lime wedges, and jalapeños allow you to personalize each taco and add fresh, bright notes that cut through the richness.
Everything's prepped? Good. Let's get into the real action...
The Method — Step by Step
- Heat the olive oil in a large skillet over medium heat. Add the diced onion and cook until translucent, about 3–4 minutes. Stir in the minced garlic and let it sizzle for 30 seconds until fragrant. This is the moment of truth where the base flavors start to bloom.
- Stir in the cumin, chili powder, dried oregano, and onion powder. Cook the spices for 1 minute, letting them toast slightly to release their essential oils. The aroma should be rich and inviting—like a warm campfire in your kitchen.
- Add the shredded chicken, rinsed beans, diced green chiles, and chicken broth to the skillet. Stir until everything is well combined, then bring the mixture to a gentle simmer. Cover and let it cook for 10 minutes, allowing the flavors to meld. The chili should thicken slightly and develop a creamy consistency.
- Reduce the heat to low and fold in the cream cheese, breaking it into small cubes so it melts evenly. Stir continuously until the sauce becomes silky and glossy. This step is crucial; if you add the cream cheese too quickly, it might curdle.
- While the chili is still hot, warm the tortillas on a dry skillet over medium heat for 30 seconds per side, or wrap them in a damp paper towel and microwave for 20 seconds. This prevents them from cracking when you fold them around the filling.
- Spoon a generous amount of the creamy chili onto each warmed tortilla. Top with optional cilantro, diced avocado, cotija cheese, a squeeze of lime, and sliced jalapeños if desired. The lime juice adds a bright citrus note that cuts through the richness.
- Fold the tortilla over the filling, creating a snug pocket of flavor. Serve immediately while the chili is hot and the tortillas are still pliable. The combination of hot sauce and warm tortilla creates a comforting, mouthwatering bite.
That's it — you did it. But hold on, I've got a few more tricks that'll take this to another level. Stay with me, and let’s dive into some insider knowledge that will make every taco a triumph.
Insider Tricks for Flawless Results
The Temperature Rule Nobody Follows
Many people start their chili on high heat, hoping to speed up the process. However, cooking the chili on medium to low heat allows the flavors to develop fully and prevents the cream cheese from curdling. I’ve found that a gentle simmer for 15 minutes after adding the cream cheese is the sweet spot for a silky sauce.
Why Your Nose Knows Best
Your nose is your best judge of doneness. When the chili hits a fragrant, toasty aroma, it’s a sign that the spices have released their essential oils and the onions are caramelized. Trust your senses; if it smells like a campfire, it’s ready.
The 5‑Minute Rest That Changes Everything
After you’ve added the cream cheese, let the chili rest off the heat for five minutes before serving. This resting period allows the flavors to marry and the sauce to thicken slightly, giving you a richer, more cohesive bite. It also gives the tortilla time to absorb the sauce without becoming soggy.
Tortilla Warmth Matters
Warming tortillas properly is crucial. A cold tortilla will crack when you fold it over the chili, while a too-hot tortilla can burn your mouth. Aim for a temperature where the tortilla is pliable but not steaming. A quick 30‑second pan‑heat or 20‑second microwave works wonders.
Layering Toppings for Texture
When adding toppings, layer them strategically: start with a base of cilantro, then avocado, sprinkle cotija, and finish with lime and jalapeños. This layering ensures that each bite delivers a burst of flavor and a satisfying contrast of textures—from creamy to crunchy.
Make‑Ahead Magic
If you’re preparing for a crowd, the chili can be made a day ahead. The flavors will deepen, and the sauce will thicken, giving it a richer mouthfeel. Store it in an airtight container in the fridge for up to 3 days. Reheat gently on the stovetop, adding a splash of broth to restore moisture.
Creative Twists and Variations
This recipe is a playground. Here are some of my favorite ways to switch things up:
Mediterranean Twist
Swap the Great Northern beans for chickpeas and add a splash of lemon juice. Top with crumbled feta and chopped parsley. The result is a bright, tangy taco that feels like a Mediterranean mezze.
Mexican Street Food Vibe
Use corn tortillas and finish with a drizzle of chipotle mayo. Sprinkle with diced red onion and a handful of fresh cilantro. The smoky mayo adds depth and a creamy contrast to the chili.
Low‑Carb Edition
Replace the flour tortillas with lettuce leaves or low‑carb wraps. Keep the creamy chili and toppings the same. This version is perfect for keto or paleo diners.
Vegan Version
Use a plant‑based cream cheese alternative and substitute the chicken with shredded jackfruit or tofu. The texture will be slightly different but still satisfying, and the flavor profile remains intact.
Smoky BBQ Flavor
Add a tablespoon of smoked paprika and a splash of BBQ sauce to the chili. Top with pickled red onions and a sprinkle of cheddar cheese. This variation brings a sweet and smoky dimension to the tacos.
Breakfast Taco Takeover
Serve the chili over a tortilla, then top with a fried egg and a drizzle of hot sauce. The combination of savory chili and runny yolk creates a breakfast‑style taco that’s both hearty and indulgent.
Storing and Bringing It Back to Life
Fridge Storage
Store the chili in an airtight container for up to 3 days. Keep the tortillas separate in a zip‑lock bag to avoid sogginess. When ready to serve, reheat the chili on the stovetop over low heat, stirring occasionally.
Freezer Friendly
Freeze the chili in a freezer‑safe container for up to 3 months. Thaw overnight in the refrigerator before reheating. Add a splash of broth or water to restore moisture if the chili looks dry.
Best Reheating Method
The best way to reheat is on the stovetop over low heat, stirring gently until warmed through. If you’re in a hurry, microwave on medium power for 2 minutes, then stir and continue heating in 30‑second increments. Adding a tiny splash of water before reheating helps the sauce steam back to perfection.