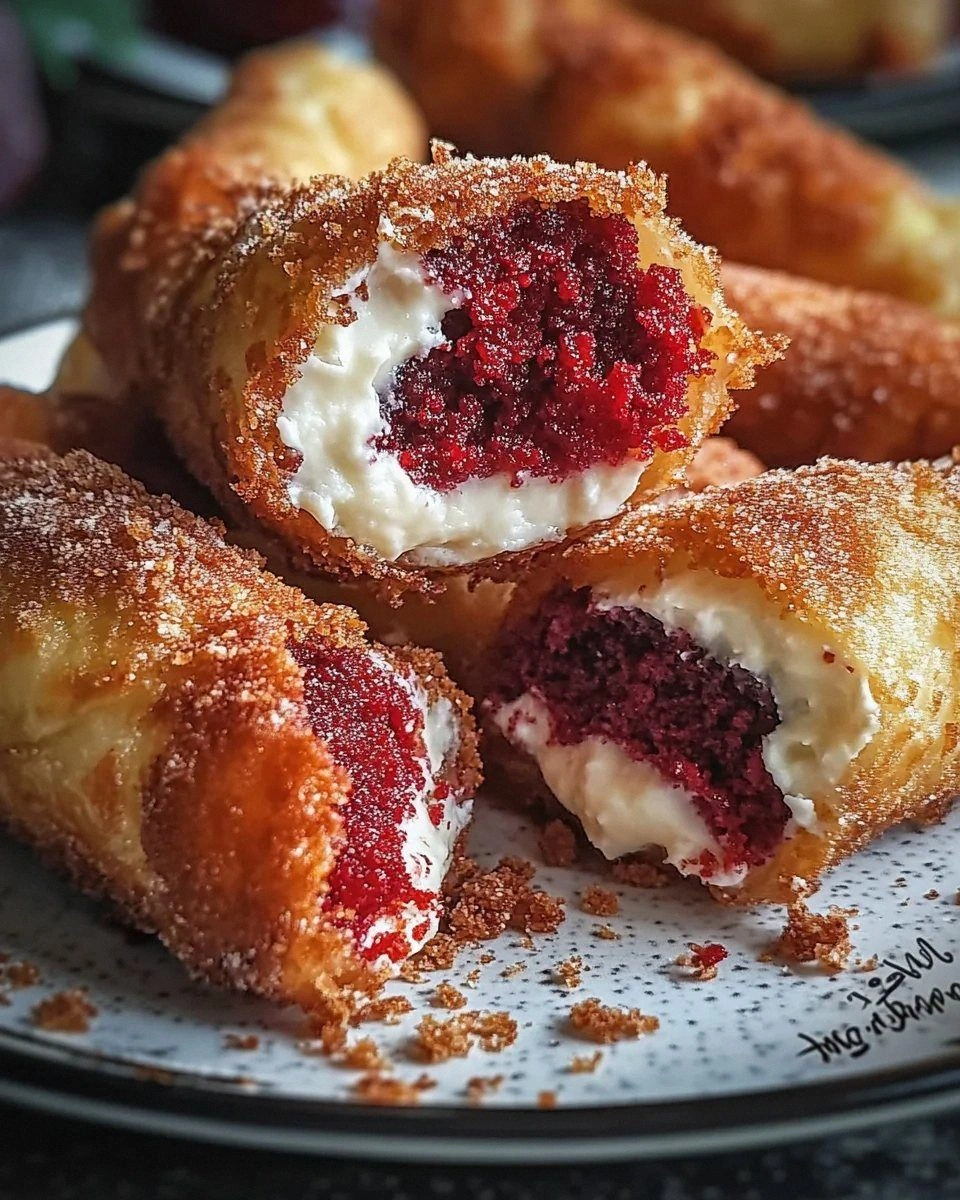
Picture this: it’s a rainy Saturday afternoon, the kind that makes you want to curl up with something sweet, but you’re also craving that crunchy, indulgent bite that feels like a party in your mouth. I was stuck between a bowl of soggy cereal and a half‑baked brownie when my friend dared me to combine two of my favorite comfort foods into one unstoppable treat. The result? Red Velvet Cheesecake Egg Rolls – a mash‑up that sounds insane, tastes divine, and will have you shouting, “I dare you to taste this and not go back for seconds!” I’ll be honest — I ate half the batch before anyone else got a chance, and the crumbs on the counter are still whispering for more.
The moment the batter hit the pan, a fragrant cloud of cocoa‑kissed sugar rose, wrapping the kitchen in a scent that could coax anyone out of a bad mood. The egg roll wrappers, slick and glossy, sizzled as they hit the hot oil, their edges snapping like thin ice under a winter sun. When I lifted the first golden roll, the glossy glaze dripped down the sides, catching the light like a ruby‑red sunrise. The first bite was a perfect collision: the crisp, buttery shell gave way to a velvety red‑velvet cake core, and then—bam!—a creamy cheesecake heart that melted like a dream on your tongue.
What makes this version stand out from the sea of copy‑cat recipes? Most versions either skimp on the cheesecake filling, resulting in a dry, one‑dimensional bite, or they over‑load the wrapper, making it soggy and sad. I cracked the code by using a boxed red‑velvet mix (yes, the shortcut that actually works) paired with a rich, slightly tangy cream cheese filling that stays firm enough to hold its shape during frying. The secret is a quick glaze that locks in moisture while adding a glossy finish that looks as good as it tastes. And there’s a surprise twist: a dash of vanilla that elevates the whole experience to “I’m eating dessert for dinner” level.
Let me walk you through every single step — by the end, you’ll wonder how you ever made it any other way. Okay, ready for the game‑changer? This isn’t just a recipe; it’s a culinary adventure that will make you the hero of every potluck, brunch, or midnight snack raid. Stay with me here — this is worth it.
What Makes This Version Stand Out
- Flavor Explosion: The red‑velvet cake mix brings that iconic cocoa‑kissed sweetness, while the cream cheese filling adds a tangy richness that balances the sugar perfectly.
- Texture Harmony: A crisp, golden wrapper meets a soft, cake‑like interior and a silky cheesecake core – three textures in one bite that dance together.
- Simplicity Meets Luxury: Using a box mix saves you time, yet the result feels like a bakery‑level dessert that took hours to perfect.
- Visual Wow Factor: The glossy red glaze catches the eye, making these egg rolls Instagram‑ready without any extra effort.
- Crowd‑Pleaser: Whether it’s a kid’s birthday, a romantic date, or a casual game night, these rolls get rave reviews and empty plates.
- Ingredient Quality: Each component, from the premium cream cheese to the fresh vanilla extract, is chosen for maximum flavor impact.
- Frying Technique: Deep‑frying at the right temperature ensures the wrapper stays crunchy while the interior stays moist.
- Make‑Ahead Potential: You can prep the rolls ahead of time and fry them just before serving, keeping stress levels low.
Inside the Ingredient List
The Flavor Base
Red velvet cake mix: This box mix saves you time and provides rich, cocoa‑infused flavor with that signature pink hue. The mix already contains cocoa powder, buttermilk powder, and a touch of vinegar that reacts to create that tender crumb. Skipping it means you’ll have to balance cocoa, acid, and color yourself, which can be a nightmare if you’re not a chemist. If you’re feeling adventurous, you can swap the mix for a homemade red‑velvet batter, but be prepared for extra steps.
The Texture Crew
Cream cheese: The star of our cheesecake filling! Make sure it’s softened for easy mixing; you’ll get a smooth, velvety texture that won’t crack when fried. Using full‑fat cream cheese is non‑negotiable – low‑fat versions become grainy and won’t hold up in the heat. If you want an even richer mouthfeel, blend in a spoonful of mascarpone; just remember to keep the total volume the same.
Egg roll wrappers: These thin sheets are the vessel that turns everything into a handheld masterpiece. Look for the fresh, refrigerated kind; frozen wrappers can become brittle after thawing. If you can’t find them, spring roll wrappers work in a pinch, but they’ll be a tad softer.
The Unexpected Star
Vegetable oil: Essential for frying, it gives that savory golden crunch. I prefer a neutral oil with a high smoke point, like canola or peanut, because it won’t interfere with the delicate red‑velvet flavor. Using olive oil will make the rolls taste like a Mediterranean snack – not a bad thing, but not what we’re aiming for.
The Final Flourish
Powdered sugar & Milk: These two team up to create a glossy glaze that coats each roll like a silk veil. The powdered sugar dissolves instantly, while a splash of milk gives it the perfect pourable consistency. If you want a richer glaze, substitute half the milk with heavy cream; just be careful not to make it too thick, or it will clump.
Everything's prepped? Good. Let's get into the real action…
The Method — Step by Step
Preheat your deep‑fryer or a heavy‑bottomed pot to 350°F (175°C). While the oil heats, whisk together the red‑velvet cake mix with the eggs, oil, and water exactly as the box instructs. The batter should be smooth and glossy, not too runny; think of a thick pancake batter that holds its shape when dropped from a spoon. Power transition: This is the moment of truth — the base of our roll.
In a separate bowl, beat the softened cream cheese until fluffy, then add granulated sugar and vanilla extract. Mix until the sugar dissolves and the mixture is light, airy, and just a hint of sweet. Watch Out: Over‑mixing will incorporate too much air, causing the filling to puff up and leak during frying.
Watch Out: If the cream cheese is too cold, it will create lumps that won’t smooth out later, leading to uneven texture.Lay out a sheet of parchment and spoon a generous tablespoon of the cake batter onto the center of an egg‑roll wrapper. Spread it gently with the back of a spoon, leaving about a half‑inch border. The batter layer should be thin enough to roll but thick enough to hold the cheesecake filling without breaking.
Place a dollop (about a teaspoon) of the cheesecake mixture on top of the batter. Then, fold the sides of the wrapper over the filling and roll tightly, sealing the edge with a dab of water. Kitchen Hack: Use a small pastry brush to apply water; too much will make the wrapper soggy, too little and it won’t seal.
Repeat the assembly until you’ve used all the wrappers. At this point, you can either fry immediately or place the rolls on a tray, cover with plastic wrap, and freeze for up to 2 hours (see the earlier hack). This pause helps the batter set, preventing leaks when the oil hits.
When the oil is steady at 350°F, gently lower 2–3 rolls into the pot, being careful not to crowd them. Fry for 2–3 minutes, turning once, until the wrappers turn a deep golden‑brown and the aroma of red velvet fills the kitchen. The edges should start pulling away from the pan, a sign they’re perfectly cooked.
Using a slotted spoon, transfer the hot rolls onto a paper‑towel‑lined plate to drain excess oil. While still warm, whisk together powdered sugar and milk until you achieve a glossy glaze that drips slowly. Drizzle the glaze over each roll, letting it cascade down the sides like a ruby river.
Kitchen Hack: If the glaze thickens too quickly, whisk in an extra teaspoon of milk; if it’s too runny, add a pinch more powdered sugar.Let the glaze set for a minute, then serve while still warm. The contrast between the hot, crunchy exterior and the cool, creamy interior is pure magic. Pair with a cold glass of milk or a bold espresso for an indulgent finish.
Store any leftovers in an airtight container in the fridge for up to 2 days. Re‑heat in a hot oven (350°F) for 5 minutes to bring back that crisp snap.
That's it — you did it. But hold on, I've got a few more tricks that'll take this to another level…
Insider Tricks for Flawless Results
The Temperature Rule Nobody Follows
Maintaining a steady 350°F is crucial. If the oil is too cool, the wrapper absorbs oil and becomes soggy; too hot, and the outside burns before the inside cooks. Use a candy thermometer and adjust the heat in small increments. I once tried a “set‑and‑forget” approach and ended up with a greasy disaster – never again.
Why Your Nose Knows Best
Before you even see the golden color, trust the aroma. When the rolls are done, a sweet, buttery scent with a hint of cocoa will waft up. If you smell oil burning, pull them out immediately; the flavor will be ruined. Your nose is a built‑in timer, so don’t ignore it.
The 5‑Minute Rest That Changes Everything
After frying, let the rolls rest on a wire rack for exactly five minutes before glazing. This short pause lets the interior steam settle, preventing the glaze from soaking into a still‑hot interior and turning soggy. I used to glaze right away and ended up with a gummy coating – the rest period fixed that.
Seal the Deal with Water
A tiny dab of water on the wrapper edge is all you need to seal the roll. Too much water creates a weak spot that bursts open; too little and the wrapper will unroll. I recommend a wet fingertip – it gives just enough moisture to act like edible glue.
Glaze Consistency is Key
The glaze should be thick enough to coat but thin enough to drip. If you’re using powdered sugar that’s slightly clumped, sift it first. Add milk a few drops at a time; you’ll have better control. Too runny and the roll will look like a glazed donut; too thick and it will crack.
Creative Twists and Variations
This recipe is a playground. Here are some of my favorite ways to switch things up:
Chocolate‑Covered Delight
Swap the powdered‑sugar glaze for a dark chocolate ganache. Melt ½ cup chocolate with ¼ cup cream, dip each roll, and let it set. The bittersweet chocolate pairs beautifully with the red‑velvet base, turning the snack into a sophisticated bite.
Berry Burst
Fold a tablespoon of raspberry jam into the cheesecake filling. The tartness of the berries cuts through the sweetness, offering a fresh pop that’s perfect for spring gatherings.
Spiced Autumn
Add a pinch of ground cinnamon and nutmeg to the cake batter. The warm spices give the rolls a cozy, fall‑time vibe, especially when served with a caramel drizzle.
Vegan Version
Replace the cream cheese with a firm tofu‑based “cheesecake” mixture, use a plant‑based oil, and choose a vegan red‑velvet mix (or make your own). The result is still indulgent, and you won’t miss the dairy.
Mini Bites
Cut the egg‑roll wrappers in half before assembling. You’ll end up with bite‑size appetizers perfect for cocktail parties, and they fry up even faster.
Storing and Bringing It Back to Life
Fridge Storage
Place the cooled rolls in an airtight container lined with parchment paper. They’ll stay fresh for up to 48 hours. The glaze may firm up; simply let them sit at room temperature for 10 minutes before serving.
Freezer Friendly
Wrap each roll individually in plastic wrap, then place them in a zip‑top bag. Freeze for up to 1 month. When ready, thaw in the fridge for 2 hours, then re‑heat in a 350°F oven for 5‑7 minutes to regain crispness.
Best Reheating Method
Preheat your oven to 350°F, place the rolls on a wire rack over a baking sheet, and heat for 5 minutes. Add a tiny splash of water (about a teaspoon) to the tray; the steam helps the interior stay moist while the exterior crisps back up.