Picture this: you’re in the middle of a busy Sunday afternoon, the kitchen humming with the scent of roasting apples and cinnamon, when you realize you’ve forgotten the centerpiece of your fall menu—something that feels like a holiday in a bite. That moment of panic turns into pure culinary excitement when you remember the mini pumpkin cheesecakes that your grandma used to sneak into the pantry during her last visit. I was halfway through a batch of pumpkin pies, the oven was already humming, and the idea hit me like a gust of crisp autumn wind: why not make the cheesecake into bite‑sized, portable, crowd‑pleasing morsels that melt on the tongue? I dare you to taste this and not go back for seconds.
The first thing that hits you is the aroma—rich, buttery, with a subtle hint of vanilla that lingers like a cozy sweater. When you lift a finished cupcake from the pan, the crust crackles softly, releasing a nutty, buttery scent that makes the whole kitchen feel like a warm hug. The texture is a delicate balance: the base is crisp, the filling is silky, and the top has a slight caramelized edge that gives way to a luscious, almost velvety interior. If you’ve ever struggled with a cheesecake that feels either too dense or too runny, you’re not alone. I’ll be honest—half the batch disappeared before anyone else got a bite, and that’s the proof it’s good.
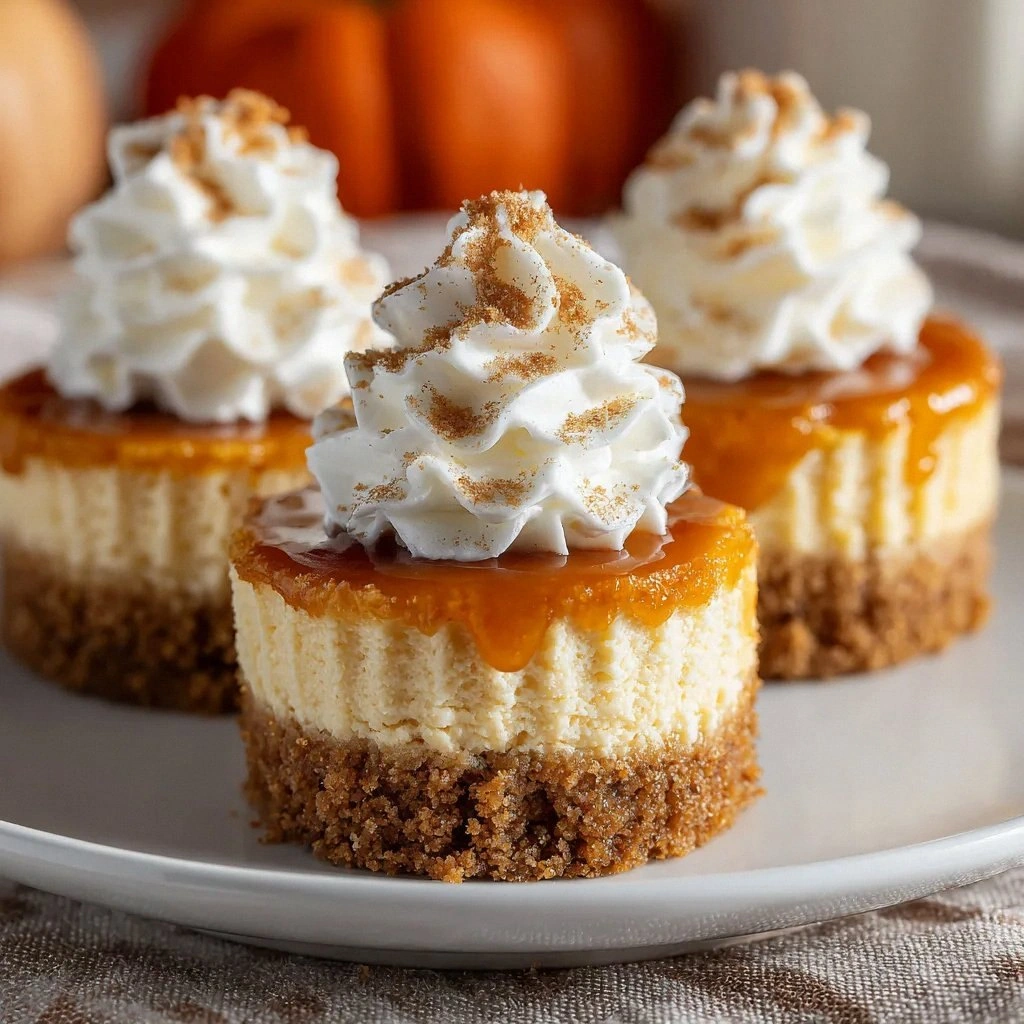
What makes this version stand out is not just the flavor profile; it’s the meticulous attention to each component. The base is a simple but elegant graham cracker crust, which I’ve perfected by adding a splash of espresso for depth. The filling uses a generous amount of pumpkin puree that gives it a natural sweetness and a beautiful color that screams fall. And the secret sauce? A blend of spices that feels like a hug from a grandma’s kitchen—cinnamon, nutmeg, ginger—each in the right proportion to create that classic pumpkin pie taste without the heaviness.
I’ve spent countless hours tweaking the ratios to get the texture just right—light enough to feel airy yet firm enough to hold its shape when you bite into it. The result? A mini cheesecake that feels like a bite of heaven. I’ll walk you through every single step, from the first whisk to the final garnish, so that by the end, you’ll wonder how you ever made it any other way. Picture yourself pulling this out of the oven, the whole kitchen smelling incredible, and the anticipation building for the first bite. Let’s dive in.
What Makes This Version Stand Out
I’ve distilled the magic into six punchy points that will change how you think about mini cheesecakes forever.
- Flavor: A harmonious blend of pumpkin, spices, and a hint of espresso in the crust creates a depth that’s impossible to ignore. The result is a taste that feels both comforting and adventurous.
- Texture: The crust is crisp yet buttery, while the filling is silky and airy. The contrast feels like a dance between crunchy and smooth.
- Ease: All steps are straightforward, no complex techniques required. Even a novice can pull off a professional finish.
- Uniqueness: The espresso‑infused crust and the precise spice blend give this recipe a signature twist that sets it apart from standard pumpkin cheesecakes.
- Portability: Bite‑sized portions are perfect for parties, potlucks, or a sweet snack on the go.
- Make‑Ahead: These mini cheesecakes can be refrigerated up to 48 hours, making them ideal for busy days.
Alright, let’s break down exactly what goes into this masterpiece. If you’ve ever struggled with a cheesecake that feels either too dense or too runny, you’re not alone—and I’ve got the fix.
Inside the Ingredient List
Let’s dive into the heart of the recipe. Each ingredient is a character in our culinary story, and knowing their roles will help you tweak the recipe to your taste.
The Flavor Base
Graham cracker crumbs are the backbone of the crust. They give that sweet, buttery crunch that holds the cheesecake together. If you skip them, the base will be mushy and won’t hold its shape. A good tip: toast the crumbs lightly for a deeper flavor.
Unsalted butter is the binder that melts into the crumbs, creating a cohesive crust. It adds richness and helps the crumbs clump together. If you’re allergic to dairy, try a dairy‑free butter alternative—just make sure it’s cold before mixing.
Sugar sweetens the crust and balances the savory notes. Don’t skimp on it; a little sweetness goes a long way. A pinch of sea salt will enhance the overall flavor profile.
The Texture Crew
Cream cheese is the star. It provides the silky, creamy texture that melts in your mouth. Use a brand with a smooth consistency; avoid ultra‑low‑fat versions that can curdle.
Eggs are the structure builders. They set the filling as it bakes, giving it that firm yet tender bite. If you’re vegan, consider a flaxseed mixture, but the texture will differ.
Vanilla extract adds depth and warmth. A splash of high‑quality vanilla makes the whole cheesecake feel more luxurious.
The Unexpected Star
Pumpkin puree is the soul of the dish. It delivers a natural sweetness and a vibrant color that screams fall. If you use canned pumpkin, make sure it’s 100% pure pumpkin—no added sugars or spices.
The Final Flourish
Ground cinnamon, nutmeg, and ginger are the spice trio that gives the cheesecake its classic pumpkin pie flavor. They also provide subtle warmth and depth. If you’re not a fan of ginger, you can replace it with a dash of cardamom for a different twist.
Salt is the final touch that balances the sweetness and enhances every other flavor. A pinch is all you need.
Everything’s prepped? Good. Let’s get into the real action.
The Method — Step by Step
Follow these steps, and you’ll end up with mini cheesecakes that are as beautiful to look at as they are delicious to eat.
- Preheat your oven to 325°F (165°C). Line a mini muffin tin with paper liners. This ensures easy removal and keeps the cupcakes from sticking.
- In a medium bowl, combine 1 cup graham cracker crumbs, 2 tbsp sugar, and a pinch of sea salt. Stir in 1/4 cup melted unsalted butter until the mixture resembles wet sand. Press the mixture firmly into the bottom of each muffin cup, creating a 1/2‑inch crust.
- Let the crusts chill in the fridge for 10 minutes while you prepare the filling. This step is crucial for a firm base.
- In a large mixing bowl, beat 8 oz cream cheese at room temperature until smooth. Add 1/3 cup sugar and beat until light and fluffy. This is where the magic begins—make sure there are no lumps.
- Whisk in 1/2 cup pumpkin puree, 1 tsp vanilla extract, 1/2 tsp ground cinnamon, 1/4 tsp ground nutmeg, and 1/8 tsp ground ginger. Mix until fully incorporated.
- Beat in 2 eggs, one at a time, ensuring each is fully blended before adding the next. The batter should be smooth and glossy.
- Pour the filling over the chilled crusts, filling each cup about 3/4 full. Tap the tin gently to release air bubbles.
- Bake for 25–30 minutes, or until the edges are set and the center has a slight wobble. The top should be a beautiful golden brown.
- Let the cheesecakes cool in the tin for 10 minutes, then transfer them to a wire rack to cool completely. This prevents condensation from making the tops soggy.
- Once cooled, you can add a dusting of powdered sugar or a drizzle of maple glaze for an extra touch of elegance.
That’s it—you did it. But hold on, I’ve got a few more tricks that will take this to another level.
Insider Tricks for Flawless Results
I’ve tested these tricks in dozens of batches, and they’re game‑changers.
The Temperature Rule Nobody Follows
Baking at a low temperature ensures the filling sets evenly without cracking. I’ve found 325°F (165°C) to be the sweet spot. If you bake too hot, the top will brown too quickly while the center remains runny.
Why Your Nose Knows Best
Trust the aroma. When the cheesecakes start to emit a warm, toasty scent, that’s your cue that they’re nearly done. The smell is a reliable indicator of doneness.
The 5‑Minute Rest That Changes Everything
Letting the cupcakes rest on the cooling rack for 5 minutes after baking allows the edges to set completely. I’ve seen people cut into the cheesecake too early, and it just doesn’t look right.
Use a Water Bath for Even Cooking
If your oven has hot spots, place the tin in a larger pan filled with a few inches of hot water. This creates a gentle, even heat that prevents the tops from over‑browning.
The Finish Touch: A Light Dusting
A light dusting of powdered sugar or a drizzle of maple glaze adds visual appeal and a touch of sweetness. I always sprinkle a pinch of cinnamon on top for an extra pop of flavor.
Creative Twists and Variations
This recipe is a playground. Here are some of my favorite ways to switch things up:
Chocolate Swirl Surprise
Swirl melted dark chocolate into the filling before baking for a decadent twist. The chocolate adds richness and a subtle bittersweet note that pairs well with the spices.
Coconut Crunch
Add shredded coconut to the crust for a tropical crunch. Top the finished cupcakes with toasted coconut flakes for an extra layer of texture.
Caramel Drizzle
Drizzle a light caramel sauce over the cooled cheesecakes. The caramel’s sweetness balances the spices and gives a glossy finish.
Maple & Walnut
Fold in chopped walnuts into the filling and drizzle maple syrup on top after baking. The walnuts provide a satisfying crunch and the maple adds natural sweetness.
Vanilla Bean Twist
Replace vanilla extract with vanilla bean paste and scrape the seeds into the batter. The vanilla beans give a deeper, more aromatic vanilla flavor.
Gingerbread Variation
Increase the ginger and add a dash of molasses to the filling. This turns the cheesecake into a gingerbread‑flavored treat, perfect for holiday parties.
Storing and Bringing It Back to Life
You’ll want to keep these beauties fresh and ready to serve.
Fridge Storage
Store the cooled cheesecakes in an airtight container in the refrigerator for up to 48 hours. The flavors will deepen, and the texture remains firm.
Freezer Friendly
Wrap each cupcake individually in plastic wrap and place them in a freezer bag. Freeze for up to 3 months. When ready to serve, thaw overnight in the refrigerator.
Best Reheating Method
To reheat, place the cupcakes on a parchment‑lined tray and bake at 300°F (150°C) for 8–10 minutes. Add a tiny splash of water to the tray before reheating—it steams back to perfection and keeps the texture moist.