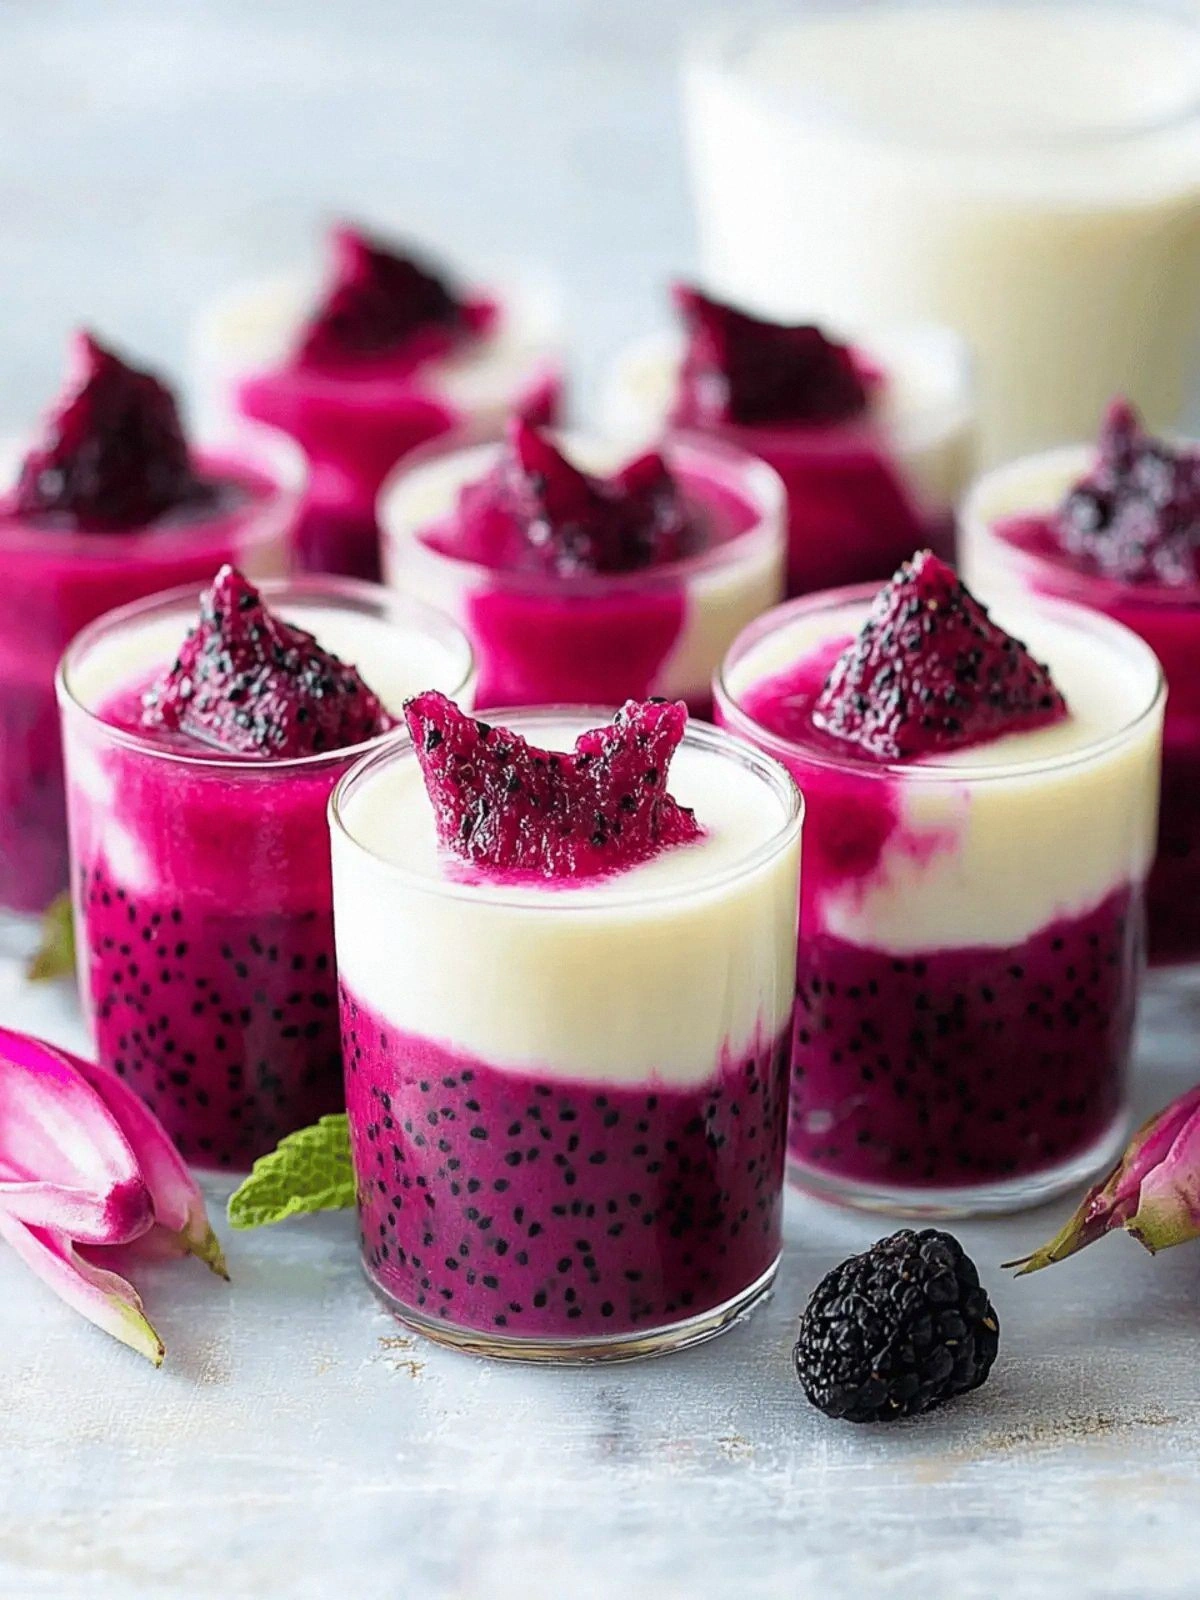
Last week I was scrambling to salvage a dessert that had turned into a sticky, gelatinous mess. The dragon fruit had exploded in my blender, flooding the counter with bright pink pulp that smelled like a tropical storm. I laughed at the chaos, but the craving for something sweet and refreshing was undeniable. That night, I decided to turn the disaster into a culinary triumph, and the result was a set of mini dessert cups that look like edible works of art. Trust me, this is hands down the best version you'll ever make at home.
Picture the moment the first cup slides onto the plate: a translucent halo of dragon fruit, a faint citrus tang that tickles the nose, and a gentle, sweet aroma that feels like a sunrise in a bowl. The texture is a silky, panna cotta‑like base that melts in your mouth, while the fresh mint leaves provide a cool, herbaceous counterpoint. The sound is almost audible—each spoonful gives a soft, satisfying sigh as the gelatin relaxes. The taste is a harmonious blend of subtle sweetness, tartness, and a whisper of tropical vanilla. And the feel? The cup is cool to the touch, almost like a miniature chilled glass, which is a surprise to the eye and palate alike.
I dare you to taste this and not go back for seconds, because the balance is so precise that each bite feels like a new discovery. Most recipes get this completely wrong by over‑cooking the gelatin or under‑seasoning the fruit, but here the gelatin is just enough to hold the structure while still yielding to the tongue. The secret is the dragon fruit puree, which adds natural sweetness and a vibrant color that makes the dessert pop. The fresh mint isn't just garnish; it infuses the panna cotta with a subtle aroma that lingers long after the last spoonful. This recipe is a lesson in how a single ingredient can transform an entire dish.
There's a trick I learned from a pastry chef who swears by a quick cold water bath to set the cups perfectly. That technique keeps the cups glossy and prevents any unwanted cracks, a detail that most home cooks overlook. I also discovered that a small splash of citrus zest in the gelatin mixture gives a bright lift that makes the dessert feel light and airy. If you’re ready to dive into the world of dragon fruit desserts, let me walk you through every single step—by the end, you’ll wonder how you ever made it any other way.
What Makes This Version Stand Out
- Texture: The gelatin is set just right for a silky yet firm bite that melts in your mouth. It feels like a delicate cloud that holds its shape until you take a spoonful. This gives the cups a luxurious mouthfeel that feels like a dessert on a summer day.
- Flavor: Dragon fruit puree delivers natural sweetness and a subtle hint of citrus. The fruit’s mild tartness balances the creamy base without overpowering it. The result is a harmonious blend that lingers on the palate.
- Visual Appeal: The translucent cups look like miniature glass spheres that sparkle when exposed to light. The bright pink hue of the dragon fruit pops against the creamy background. This visual wow factor makes the dessert a showstopper for any occasion.
- Ease: No advanced equipment needed; just a blender, a saucepan, and a muffin tin. The recipe can be completed in under an hour, making it perfect for busy evenings. This simplicity makes it accessible to both novices and seasoned cooks.
- Make‑Ahead: These cups can be prepared 24 hours ahead and chilled in the fridge. The gelatin continues to set, allowing flavors to meld and deepen. This makes it ideal for parties where you want to prep in advance.
- Portability: Perfect for picnics, brunches, or as a stunning party favor. The cups are sturdy enough to travel without breaking. The bite‑sized portions keep the dessert elegant and easy to serve.
Inside the Ingredient List
The Flavor Base
Half a cup of sugar dissolves into the warm water, creating a simple syrup that sweetens the entire batch. The water acts as a neutral medium, allowing the dragon fruit to shine without dilution. This syrup also helps the gelatin distribute evenly, preventing lumps. The result is a smooth, sweet foundation that supports the creamy texture.
Adding the sugar early on ensures it fully integrates before the gelatin sets. If you skip this step, the gelatin might clump and create a gritty bite. The syrup also provides a subtle caramel undertone that pairs beautifully with the tropical fruit. This base is the silent hero that keeps the dessert cohesive.
The Texture Crew
The heavy cream provides the rich, velvety body that makes the panna cotta feel indulgent. When heated, the cream thickens slightly, creating a silky consistency that coats the tongue. The cream also carries the flavor of the dragon fruit, amplifying its natural sweetness. This component is essential for achieving that luxurious mouthfeel.
Unflavored gelatin is the backbone that holds the mixture together. A tablespoon is enough to set four cups, but the key is to bloom it properly. If you add it too late, the gelatin may not dissolve, leading to an uneven texture. Proper gelatin usage guarantees a firm yet melt‑in‑the‑mouth finish.
The Unexpected Star
Dragon fruit is more than a garnish; it’s the star that gives the dessert its signature color. The flesh is naturally sweet with a mild citrus note, making it the perfect partner for the creamy base. Cutting the fruit into cubes or slicing it into thin ribbons adds visual appeal. The fruit’s bright pink hue is a natural dye that eliminates the need for artificial coloring.
The dragon fruit puree is the secret sauce that deepens flavor and texture. By blending the fruit into a smooth puree, you lock in the fruit’s natural sugars and nutrients. The puree also thickens the mixture slightly, enhancing the panna cotta’s body. This step ensures each cup delivers a consistent, vibrant taste.
The Final Flourish
A sprig of fresh mint adds a burst of herbal aroma that balances the sweetness. The mint’s subtle bitterness cuts through the richness of the cream, creating a well‑rounded flavor profile. When placed atop the cup, the mint becomes a visual accent that invites the eye. The herb also offers a cooling sensation that complements the tropical fruit.
These cups are designed to be served chilled, so the mint remains crisp and fragrant. If you prefer a more pronounced mint flavor, you can crush the leaves before adding them. The mint also pairs well with a splash of citrus zest, which we’ll discuss later. This final flourish elevates the dessert from simple to memorable.
The Method — Step by Step
- Begin by sprinkling one tablespoon of unflavored gelatin over two cups of cold water in a small bowl. Let it sit for 5 minutes, allowing the gelatin granules to absorb the liquid and swell into a soft, spongy texture. This blooming process is critical; skipping it can lead to lumps that ruin the smoothness of the final dessert. While the gelatin blooms, you can prep your other ingredients. A well‑bloomed gelatin sets the stage for a flawless panna cotta.
- In a medium saucepan, combine the heavy cream and half a cup of sugar. Warm the mixture over medium heat, stirring constantly until the sugar dissolves completely. Do not let the cream come to a full boil, as excessive heat can alter the flavor profile and cause the mixture to curdle. The goal is a gentle, aromatic steam that infuses the cream with sweetness. Keep the heat steady to maintain consistency.
- Remove the saucepan from the heat and stir in the bloomed gelatin until it is fully dissolved. The mixture should become silky and glossy, indicating the gelatin has integrated. This step is where the texture truly begins to form; a visible sheen is a good sign. If the gelatin does not dissolve, reheat gently and stir until it melts. Remember, the gelatin must be fully incorporated to avoid a gritty bite.
- While the cream cools slightly, blend one cup of dragon fruit flesh and one cup of dragon fruit puree in a blender until completely smooth. The puree should be free of seeds and lumps, ensuring a uniform color. The dragon fruit’s natural sugars will provide a subtle sweetness that balances the cream. This blended mixture also thickens the base, giving the cups a richer mouthfeel. The bright pink hue will be unmistakable in every cup.
- Gently fold the dragon fruit blend into the warm cream mixture, stirring until the color is even and the flavors meld. The mixture should have a light pink tint, indicating the fruit has fully incorporated. Avoid vigorous stirring, which can introduce air and affect the gelatin’s setting ability. The gentle fold ensures a smooth, creamy texture that coats the palate. This step is where the dessert’s character truly emerges.
- Line a 12‑cup muffin tin with paper liners or lightly oil the cups. Carefully pour the mixture into each cup, filling them about three‑quarters full to leave space for expansion. The paper liners also make the cups easier to remove once set. This is a critical moment; too much liquid can cause the cups to overflow during chilling. Ensure each cup is evenly filled for a uniform appearance.
- Place the muffin tin in the refrigerator and chill for at least 30 minutes, or until the cups are firm to the touch. During this period, the gelatin sets, giving the cups a delicate structure that holds their shape. You can test the firmness by lightly pressing the top; it should feel slightly springy. If you need a firmer set, leave them for an additional 15 minutes. The chilled cups will be ready for garnish.
- Just before serving, garnish each cup with a fresh mint sprig. The mint adds a refreshing aroma and a pop of green that contrasts beautifully with the pink. Optionally, squeeze a few drops of lime juice over the top for a citrus twist. Serve immediately, and watch guests marvel at the elegant presentation. These mini desserts are both a visual and a culinary delight.
That’s it—you did it. But hold on, I’ve got a few more tricks that’ll take this from great to unforgettable. Stay tuned for insider tips that will ensure every cup is flawless.
Insider Tricks for Flawless Results
The Temperature Rule Nobody Follows
Many bakers assume any warm liquid will do, but the key is to keep the cream below 200°F before adding gelatin. A temperature that’s too high can denature the gelatin proteins, resulting in a gummy texture. By using a thermometer, you can maintain the perfect warmth and preserve the silky finish. I once tried pouring hot cream straight into the mixture, and the cups turned out rubbery—don’t repeat my mistake!
Why Your Nose Knows Best
Fresh mint isn’t just a garnish; it’s a flavor enhancer that wakes up the palate. The aroma of mint signals to your brain that the dessert is light, even if it’s creamy. When you inhale the mint’s scent, the brain prepares the taste buds for a refreshing experience. This subtle cue makes the dessert feel less heavy and more balanced.
The 5-Minute Rest That Changes Everything
After combining the fruit blend with the cream, let the mixture sit at room temperature for five minutes before pouring. This brief pause allows the gelatin to relax slightly, reducing the risk of cracks during setting. I’ve seen cups split in half when poured too quickly, so this step is a game‑changer. Trust me, a short rest pays off big time.
Avoiding Cracks
Rapid temperature shifts can cause the gelatin to seize and crack. Keep the mixture at a consistent room temperature until it’s ready to pour, then chill it immediately. If you’re in a hurry, place the tin in the fridge for a quick 10‑minute chill before pouring. This small adjustment keeps the cups pristine and unblemished.
Enhancing Color
Adding a drop of lemon juice to the mixture brightens the pink hue without altering the flavor significantly. The acidity also helps the gelatin set more firmly. I’ve used this trick to create a vibrant contrast that makes each cup pop on the plate. A splash of citrus is a simple way to elevate the presentation.
Serving Tips
Use a small offset spatula to lift the cups from the tin; this minimizes damage to the delicate structure. Serve the cups on a chilled platter to keep them firm and cool. If you’re hosting a brunch, set a small bowl of crushed ice nearby to maintain the temperature. A little extra care ensures the dessert arrives in pristine condition.
Creative Twists and Variations
Tropical Twist
Swap the dragon fruit puree for mango puree to give the dessert a richer, sweeter tropical flavor. The mango’s natural oils deepen the cream’s body, creating a luscious mouthfeel. Pair it with a drizzle of coconut milk for an extra indulgent twist. This variation is a crowd‑pleaser at beachside gatherings.
Citrus Burst
Add lime zest to the gelatin mixture for a bright, zesty kick that contrasts the sweet fruit. The citrus notes elevate the overall flavor profile and add a subtle sparkle. Serve with a dusting of powdered sugar for an elegant finish. This version is perfect for summer brunches.
Berry Fusion
Fold in a handful of fresh blueberries before pouring to introduce a burst of tartness and visual contrast. The berries’ natural colors create a layered effect when the cups are cut open. The combination of dragon fruit and blueberries offers a complex flavor profile that excites the palate. Great for a garden party.
Coconut Cream
Replace the heavy cream with coconut milk to give the dessert a tropical, slightly nutty flavor. The coconut’s richness pairs beautifully with the dragon fruit, creating a silky, exotic treat. Ensure you use full‑fat coconut milk for the best texture. This variation is a must‑try for coconut lovers.
Sweetened with Agave
Use agave syrup instead of sugar for a lower glycemic index and a subtle caramel undertone. The agave’s liquid form makes it easier to incorporate into the mixture. It also gives the dessert a slightly different mouthfeel, adding a touch of smoothness. Perfect for health‑conscious diners.
Smoky Flavor
Add a pinch of smoked paprika to the cream mixture for an unexpected smoky depth. The paprika’s earthiness balances the fruit’s sweetness and adds complexity. Serve with a sprinkle of toasted sesame seeds for a crunchy finish. This twist is ideal for adventurous palates.
Storing and Bringing It Back to Life
Fridge Storage
Store the chilled cups in an airtight container in the refrigerator for up to 48 hours. The gelatin keeps the cups firm, but the mint may wilt after a day, so consider adding fresh mint just before serving. Keep the container on a flat surface to prevent the cups from shifting. This method maintains the dessert’s texture and flavor.
Freezer Friendly
For longer storage, place the cups in a freezer‑safe container and freeze for up to one month. Thaw them slowly in the refrigerator for at least 4 hours before serving to preserve the silky texture. The gelatin remains stable in the freezer, but the mint will lose its crispness, so garnish fresh. Freezing is a great option for busy weeks.
Best Reheating Method
To revive a frozen cup, gently warm it in a microwave on low power for 10–15 seconds. Avoid over‑heating, which can break down the gelatin. If the cup feels too cold, place it in a bowl of warm water for a minute. This quick method restores the creaminess without compromising the delicate structure.