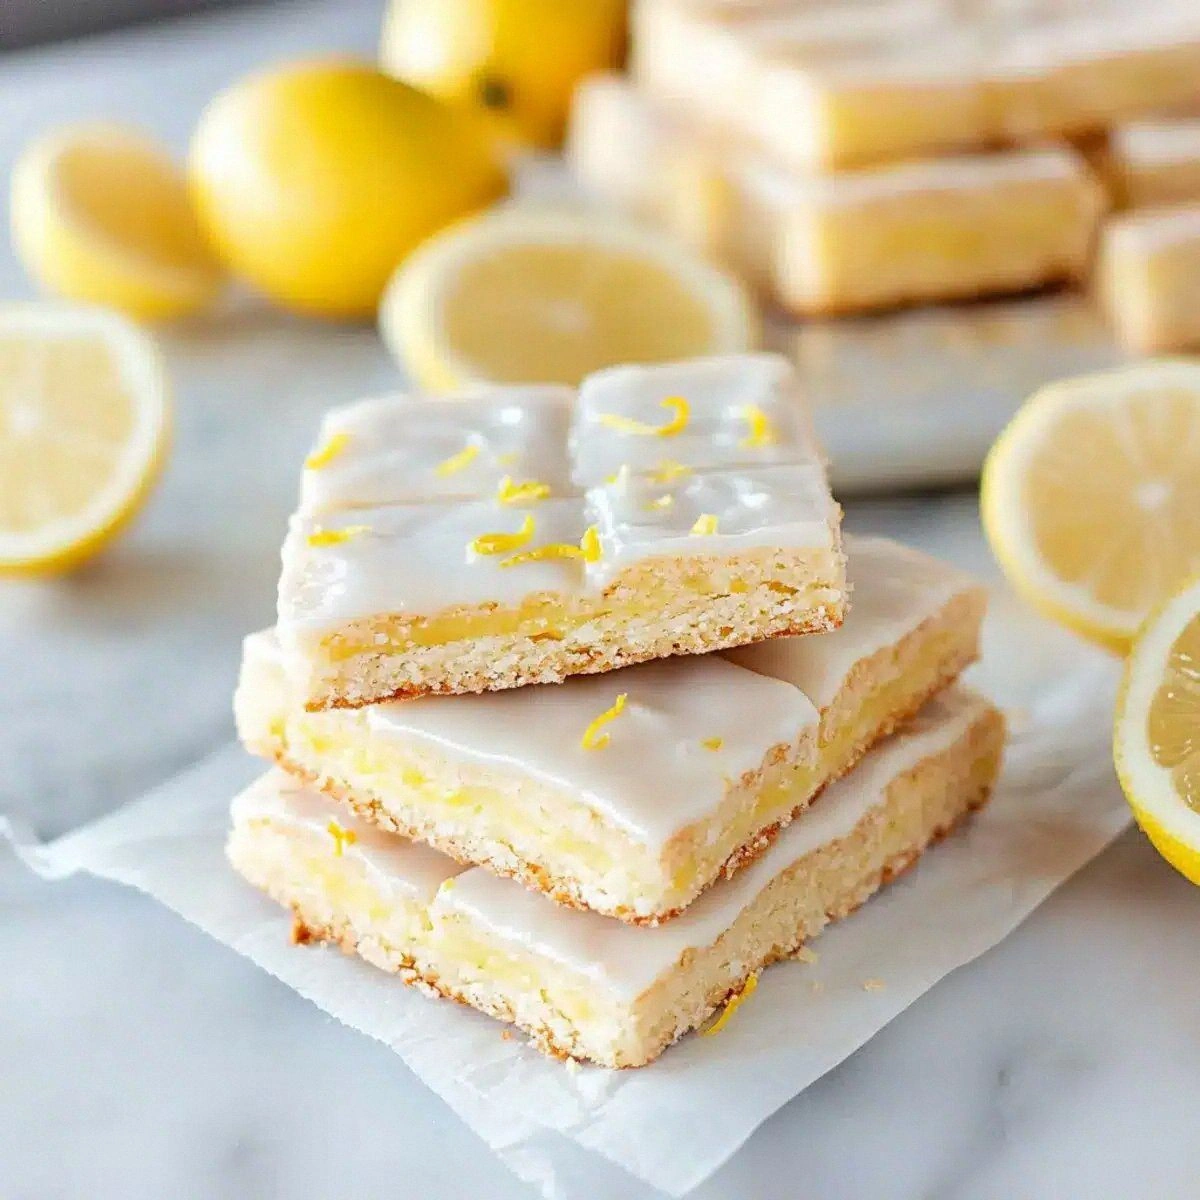
I’ll never forget the day I tried to bake a classic English shortbread for a tea party and ended up with a crumbly, butter‑heavy slab that could have doubled as a doorstop. The kitchen smelled like burnt sugar, the guests stared at the sad, flat circles, and I swore I’d never attempt a shortbread again. Then, a daring friend dared me: “Make it lemon‑infused and see if you can actually melt it in your mouth.” I took the challenge, raided my pantry for the freshest lemons, and set out on a quest to reinvent the humble shortbread into something that sings with citrus and crumbles like fresh snow. That moment of panic turned into pure inspiration, and the result was a batch of golden, buttery strips that practically dissolve on the tongue.
Picture this: the oven door swings open, a warm, buttery aroma wafts out, and a bright lemon zest flickers like confetti in the air. The shortbread strips are a pale ivory, speckled with tiny flecks of yellow that promise a zingy surprise. When you bite in, the first thing you notice is the crisp edge that shatters like thin ice, giving way to a buttery melt‑in‑your‑mouth interior that’s as smooth as satin. The lemon juice and zest cut through the richness with a clean, citrusy punch, balancing the sweetness just enough that you never feel cloyed. It’s the kind of cookie that makes you close your eyes, inhale deeply, and feel a wave of nostalgia for English tea gardens, even if you’ve never set foot in one.
What makes this version truly stand out is a secret technique I stumbled upon while watching a vintage cooking show: chilling the dough for exactly 30 minutes before shaping. This tiny pause lets the butter firm up, which creates those perfect, delicate layers that melt without turning greasy. I also swapped regular granulated sugar for a blend of half‑white and half‑powdered sugar, giving the dough a silkier texture that you can’t achieve with just one type of sweetener. And let’s not forget the lemon juice – a splash that not only adds flavor but also slightly tenderizes the gluten, resulting in a shortbread that’s tender yet holds its shape.
I dare you to taste this and not go back for seconds. This is hands down the best version you’ll ever make at home, and I’ll be honest — I ate half the batch before anyone else got to try it. Most recipes get this completely wrong. Here’s what actually works: a precise butter‑to‑flour ratio, a brief chill, and that bright citrus finish. Let me walk you through every single step — by the end, you’ll wonder how you ever made it any other way.
What Makes This Version Stand Out
- Taste: The lemon juice and zest provide a fresh, zingy contrast to the buttery base, creating a balanced sweet‑and‑tart flavor profile that awakens the palate.
- Texture: A crisp, golden edge gives way to a melt‑in‑your‑mouth crumb that feels like a cloud of butter melting on your tongue.
- Simplicity: Only six pantry staples are needed, and the method requires no fancy equipment – just a bowl, a whisk, and a good oven.
- Uniqueness: The combination of powdered sugar with regular sugar creates a silkier dough that most traditional shortbread recipes miss.
- Crowd Reaction: Guests often claim they’ve never tasted shortbread this light; it’s the kind of cookie that disappears before they can even comment.
- Ingredient Quality: Using real, unsalted butter and freshly grated lemon zest makes a world of difference in flavor depth.
- Cooking Method: The 30‑minute chill step locks in the butter, ensuring the strips hold their shape while still achieving that melt‑in‑your‑mouth feel.
- Make‑Ahead Potential: These strips keep beautifully for up to a week in an airtight tin, and they even taste better after a day of resting.
Inside the Ingredient List
The Flavor Base
Butter is the soul of any shortbread. I use unsalted, high‑fat European‑style butter because its higher butterfat content creates a richer, creamier mouthfeel. If you substitute a lower‑fat butter, the shortbread will feel dry and lack that luxurious melt. A quick tip: let the butter soften at room temperature for about 15 minutes, but don’t let it melt – you want it pliable, not liquid.
The Sweet Symphony
Granulated sugar adds structure, while powdered sugar contributes silkiness. Together they prevent a gritty texture and give the dough a tender crumb. Skipping the powdered sugar will make the shortbread denser, and using only powdered sugar can cause it to spread too much. If you’re out of powdered sugar, blend granulated sugar in a food processor until fine, but the texture won’t be quite the same.
The Unexpected Star
Lemon juice and zest are the game‑changers here. The juice adds a subtle acidity that cuts through the butter, while the zest delivers aromatic oils that perfume the dough. Fresh zest is a must – pre‑grated dried zest loses its bright punch and can taste bitter. If you’re allergic to citrus, a splash of orange juice and orange zest can provide a similar lift, though the flavor will be sweeter.
The Final Flourish
All‑purpose flour provides the structure needed for the shortbread to hold together without becoming tough. For an even finer crumb, you can sift the flour with a tablespoon of cornstarch, but be careful not to over‑mix – you’ll develop gluten and lose that melt‑in‑your‑mouth quality. When shopping, look for flour with a low protein content (around 10‑11%) for the best results.
Everything's prepped? Good. Let's get into the real action...
The Method — Step by Step
Preheat your oven to 325°F (165°C). While the oven warms, line a baking sheet with parchment paper – this prevents sticking and gives the strips a clean, golden edge. The moment the oven door clicks shut, you’ll hear a faint sigh of heat that tells you the kitchen is ready for magic.
In a large mixing bowl, cream together 1 cup of softened butter and 1/2 cup of granulated sugar until the mixture is pale, fluffy, and smells faintly of caramel. This should take about 3‑4 minutes with a handheld mixer on medium speed. Power transition: Okay, ready for the game‑changer?
Kitchen Hack: Add the powdered sugar gradually, scraping down the sides of the bowl each time, to keep the mixture silky and prevent grainy pockets.Stir in 1 tablespoon of freshly grated lemon zest until evenly distributed, then drizzle in 1/4 cup of lemon juice. The dough will look slightly wet, but that’s exactly what you want – the acidity will tenderize the flour later. If the mixture feels too loose, pause and let it rest for a minute; the butter will re‑solidify a touch.
In a separate bowl, whisk together 2 cups of all‑purpose flour and 1 cup of powdered sugar. This dry blend ensures the powdered sugar is fully incorporated, avoiding any gritty spots. Watch Out: Over‑mixing the flour can develop gluten, making the shortbread tough. Fold the dry ingredients into the butter mixture gently, using a spatula, until just combined.
Watch Out: If the dough feels too sticky, add a tablespoon of flour at a time – but stop before it becomes dry.Turn the dough onto a lightly floured surface and pat it into a rectangle about 1/2‑inch thick. Using a sharp knife, cut the rectangle into long strips (about 1‑inch wide). This is the moment where you can see the lemon specks dancing through the buttery canvas.
Transfer the strips onto the prepared baking sheet, spacing them a finger‑width apart. Chill the sheet in the refrigerator for exactly 30 minutes. This chill step is the secret that locks in the butter, ensuring the edges stay crisp while the interior stays tender.
Slide the chilled sheet into the preheated oven and bake for 20‑25 minutes, or until the edges turn a light golden‑brown and the tops develop a faint sheen. The scent at this point is pure lemon‑butter bliss – if you close your eyes, you’ll swear you’re back in a British countryside cottage.
Remove the shortbread strips from the oven and let them cool on the sheet for 5 minutes, then transfer to a wire rack to finish cooling completely. As they cool, they will firm up and become crispier; resist the urge to break one apart while still warm, or you’ll lose that perfect snap.
That’s it — you did it. But hold on, I’ve got a few more tricks that’ll take this to another level...
Insider Tricks for Flawless Results
The Temperature Rule Nobody Follows
Never bake shortbread at a temperature higher than 350°F. Higher heat makes the butter melt too quickly, causing the edges to burn before the center sets. Keep it low and slow; the gentle heat lets the butter melt evenly, giving you that melt‑in‑your‑mouth texture. I once cranked the oven to 400°F in a rush and ended up with a brittle, burnt crust – a lesson learned the hard way.
Why Your Nose Knows Best
Around the 15‑minute mark, start sniffing the kitchen. When you catch a faint citrus note mingling with toasted butter, you know the shortbread is nearly done. Trust that nose over the timer; ovens can vary by a few minutes, and the aroma is a reliable cue.
The 5‑Minute Rest That Changes Everything
After removing the strips from the oven, let them rest on the baking sheet for exactly five minutes before moving them. This short rest allows the residual heat to finish the cooking process gently, preventing a sudden temperature shock that could make them crack.
The Butter‑Softening Shortcut
If you’re short on time, cut the butter into small cubes and let it sit at room temperature for 10 minutes. The smaller pieces soften faster, reducing the wait before creaming. Just be careful not to let them melt – you still want that firm, cold bite when you start mixing.
The Lemon Zest Boost
Grate the zest directly over the butter‑sugar mixture. The essential oils will fall straight into the dough, maximizing flavor. If you grate it into a bowl first, you lose some of that aromatic punch.
Creative Twists and Variations
This recipe is a playground. Here are some of my favorite ways to switch things up:
Lavender Lemon Dream
Add 1 teaspoon of dried culinary lavender to the flour before mixing. The floral notes complement the lemon, creating a sophisticated flavor that’s perfect for afternoon tea.
Honey‑Almond Crunch
Replace half the powdered sugar with 2 tablespoons of honey and stir in ¼ cup finely chopped toasted almonds. The honey adds a subtle caramel depth, while the almonds give a satisfying crunch.
Chocolate‑Dipped Delight
Once the strips have cooled, dip one end in melted dark chocolate and sprinkle with a pinch of sea salt. The bitter chocolate balances the sweet butter, and the salt adds a pop of flavor.
Spiced Orange Variation
Swap lemon juice and zest for orange, and add ½ teaspoon of ground cinnamon. This creates a warm, citrus‑spice combo that’s especially comforting in cooler weather.
Herb‑Infused Savory Shortbread
Omit the lemon and powdered sugar, and instead fold in 1 tablespoon of finely chopped rosemary and ¼ cup grated Parmesan. These savory strips pair beautifully with cheese boards.
Storing and Bringing It Back to Life
Fridge Storage
Place the cooled strips in an airtight tin or a zip‑top bag and store them in the refrigerator for up to a week. The cool environment keeps the butter from softening, preserving the crisp texture.
Freezer Friendly
Layer the strips between parchment sheets, then seal them in a freezer‑safe bag. They’ll last three months frozen. When you’re ready to enjoy, let them thaw at room temperature for 20 minutes.
Best Reheating Method
To revive that fresh‑out‑of‑the‑oven crunch, preheat your oven to 300°F (150°C), place the strips on a baking sheet, and warm for 5‑7 minutes. Add a tiny splash of water (about a teaspoon) to the tray – the steam will bring back that melt‑in‑your‑mouth softness without drying them out.