Love this? Pin it for later! 📌
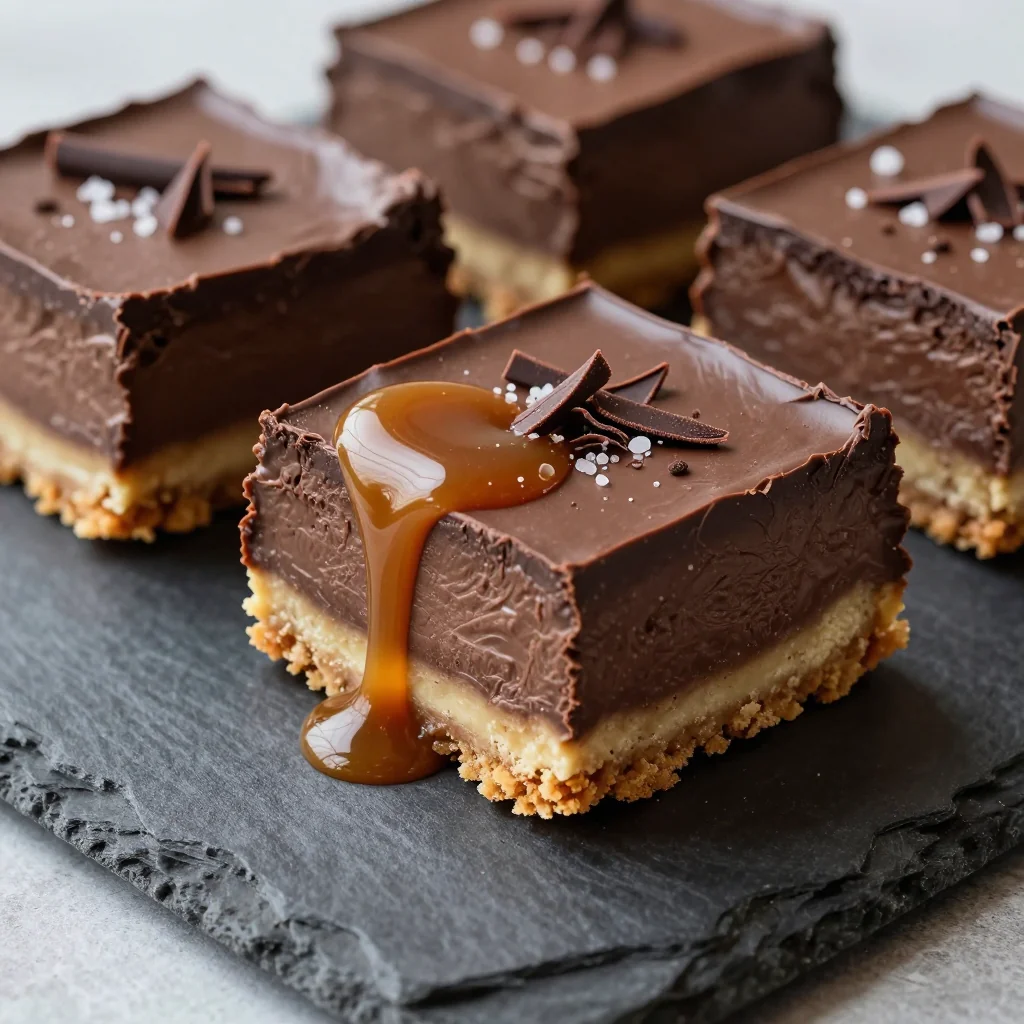
Imagine this: it's 9 p.m. on a Thursday, the kids are finally asleep, and you're curled up on the couch with a square of pure bliss in your hand. The first bite hits you with that perfect balance of rich chocolate, silky cheesecake, and that addictive sweet-salty caramel that makes your eyes close involuntarily. That's exactly what happened to me last week when I perfected these no-bake cheesecake bars.
I've been developing this recipe for months, testing different ratios of chocolate to caramel, playing with salt levels, and experimenting with various cookie crusts. The breakthrough came when I realized that the secret wasn't just in the ingredients—it was in the method. By creating distinct layers that complement rather than compete with each other, these bars became the star of my neighborhood potluck and the most-requested dessert from my teenagers' friends.
What makes these particularly special is their versatility. They're elegant enough for a dinner party yet simple enough for a Tuesday night craving. The no-bake aspect means you won't heat up your kitchen during summer months, and they can be made entirely in advance—perfect for entertaining or meal prep. Plus, that gorgeous layered presentation never fails to impress guests who think you've spent hours slaving away in the kitchen.
Why This Recipe Works
- No oven required: Perfect for hot summer days or when your oven is occupied with dinner prep
- Make-ahead magic: Actually improves in flavor after 24-48 hours in the refrigerator
- Perfect texture contrast: Crunchy cookie base, creamy cheesecake middle, silky chocolate top
- Customizable sweetness: Easy to adjust salt levels for perfect sweet-savory balance
- Beginner-friendly: No water baths, no cracking, no complicated techniques required
- Portion controlled: Pre-cut into tidy squares means no messy slicing later
- Freezer-friendly: Stash a batch for unexpected guests or late-night cravings
Ingredients You'll Need

Let's talk about each component because every ingredient here plays a crucial role. Starting with the crust: I use chocolate sandwich cookies (think Oreos) because they provide the perfect chocolate base without being overly sweet. The cream filling in the cookies actually helps bind the crust together when mixed with melted butter. If you're feeling fancy, you could substitute chocolate graham crackers, but I find the sandwich cookies give superior flavor and texture.
For the cheesecake layer, full-fat cream cheese is non-negotiable. I've tried this with reduced-fat versions, and the texture suffers significantly. The fat content is what gives you that luxurious, smooth mouthfeel. Make sure your cream cheese is completely softened—this prevents lumps in your final product. I leave mine out for at least 2 hours before starting.
The heavy cream gets whipped to stiff peaks, which lightens the cheesecake layer and gives it that mousse-like quality. Don't substitute with whipped topping from a tub; the stabilizers in those products can make your bars grainy. Pure heavy cream, chilled, is your best friend here.
Now, the caramel. Oh, the caramel! I make my own because it's surprisingly simple and the flavor is incomparable. You'll need granulated sugar, heavy cream (yes, more cream), butter, and a good quality sea salt. I prefer fleur de sel or Maldon salt flakes because they provide little bursts of saltiness rather than dissolving completely into the caramel. The contrast between sweet and salty is what makes these bars absolutely addictive.
For the chocolate ganache topping, use the best quality chocolate you can afford. I typically use a 60% dark chocolate because it provides rich chocolate flavor without being bitter. The higher percentage of cocoa solids means your ganache will set firmly, creating that beautiful, shiny topping that cuts cleanly. Milk chocolate would make the bars overly sweet, while very dark chocolate (80%+) might be too intense for some palates.
How to Make Indulgent Chocolate and Salted Caramel Cheesecake Bars That are No Bake
Prepare your pan and make the crust
Line a 9-inch square baking pan with parchment paper, leaving overhang on two sides to create "handles" for easy removal later. In a food processor, pulse 24 chocolate sandwich cookies into fine crumbs. You want them processed to the consistency of sand—no large pieces remaining. Add 5 tablespoons of melted unsalted butter and pulse until the mixture resembles wet sand. Press this mixture firmly and evenly into the bottom of your prepared pan. I use the bottom of a measuring cup to really pack it down—this prevents a crumbly crust. Refrigerate while you prepare the next layer.
Create the salted caramel layer
In a heavy-bottomed saucepan, spread 1 cup of granulated sugar in an even layer. Cook over medium heat without stirring—just swirl the pan occasionally—until the sugar melts and turns a deep amber color. This takes about 8-10 minutes. Be patient and don't rush this step. Once the sugar is caramelized, carefully add 6 tablespoons of room temperature butter, stirring constantly. The mixture will bubble vigorously. When the butter is incorporated, slowly pour in 1/2 cup of heavy cream while stirring. Finally, add 1 teaspoon of sea salt and let the caramel cool for 5 minutes before pouring over your chilled crust. Spread into an even layer and refrigerate for 30 minutes.
Make the cheesecake filling
In a large bowl, beat 16 ounces of softened cream cheese until completely smooth and fluffy—about 3 minutes. Add 1/2 cup of powdered sugar and 1 teaspoon of vanilla extract, beating until combined. In a separate bowl, whip 1 cup of cold heavy cream to stiff peaks. Gently fold the whipped cream into the cream cheese mixture in three additions, being careful not to deflate the air you've incorporated. The final mixture should be light and mousse-like. Spread this evenly over your caramel layer, smoothing the top with an offset spatula.
Prepare the chocolate ganache
Place 6 ounces of chopped dark chocolate in a heatproof bowl. Heat 1/2 cup of heavy cream until just simmering—watch carefully as cream can boil over quickly. Pour the hot cream over the chocolate and let it sit undisturbed for 2 minutes. Then, starting from the center, gently whisk in small circles until the chocolate is completely melted and the mixture is smooth and glossy. Let this cool for 5 minutes before pouring over the cheesecake layer. You want it to still be pourable but not so hot that it melts the cheesecake layer.
Assemble and chill
Pour the ganache over the cheesecake layer, tilting the pan to ensure even coverage. Gently tap the pan on the counter to release any air bubbles. For an extra touch, you can sprinkle a few flakes of sea salt on top of the ganache while it's still wet. Cover the pan with plastic wrap, ensuring it doesn't touch the surface of the ganache. Refrigerate for at least 6 hours, but overnight is even better. This extended chilling time allows all the layers to set properly and the flavors to meld together beautifully.
Cut and serve
When ready to serve, remove the bars from the pan using the parchment paper handles. For clean cuts, heat a sharp knife under hot water, wipe it dry, and cut in one smooth motion. Wipe the knife clean between each cut. I like to cut these into 16 small squares—they're quite rich, so smaller portions are perfect. You can also cut them into larger rectangles for a more impressive presentation. Serve chilled, and watch them disappear!
Expert Tips
Temperature matters
Ensure all your dairy ingredients are at the right temperature—cream cheese and butter should be at room temperature for smooth mixing, while heavy cream should be cold for proper whipping.
Don't rush the chill
I know it's tempting to cut into these after just a couple hours, but the texture and flavor improve dramatically with proper chilling. Make them a day ahead for best results.
Prevent condensation
When covering with plastic wrap, tent it so it doesn't touch the surface. Condensation can cause water spots on your beautiful ganache top.
Clean cuts every time
For professional-looking bars, wipe your knife clean between each cut. A bench scraper also works wonderfully for cutting straight lines.
Freeze for later
These bars freeze beautifully for up to 3 months. Wrap individual squares in plastic wrap, then foil. Thaw in the refrigerator overnight.
Control the salt
Start with less salt in the caramel—you can always sprinkle more on top later. Taste preferences vary, and you can customize each batch.
Variations to Try
Peanut Butter Caramel
Stir 2 tablespoons of smooth peanut butter into the finished caramel for a nutty twist that pairs beautifully with the chocolate.
Add 2 tbsp peanut butterEspresso Cheesecake
Dissolve 1 teaspoon of instant espresso powder in the vanilla extract for a subtle coffee flavor that enhances the chocolate.
Add 1 tsp espresso powderGraham Cracker Crust
Substitute chocolate graham crackers for the sandwich cookies for a lighter, less sweet crust option with honey notes.
span class="badge bg-light text-dark">Use 1.5 cups graham crumbsMilk Chocolate Topping
Replace the dark chocolate with milk chocolate for a sweeter, creamier topping that's perfect for those who prefer less intense chocolate.
Use 8 oz milk chocolateCoconut Caramel
Replace half the heavy cream in the caramel with coconut cream and sprinkle toasted coconut on top for a tropical twist.
Use coconut cream + flakesMini Cheesecakes
Make these in a mini muffin tin for bite-sized treats perfect for parties. Reduce chilling time to 2 hours.
Use mini muffin panStorage Tips
These cheesecake bars are incredibly storage-friendly, which is part of what makes them such a fantastic dessert for entertaining. In the refrigerator, they'll keep beautifully for up to 5 days when stored properly. The key is to keep them covered with plastic wrap, but ensure the wrap doesn't touch the surface of the ganache. I like to place a piece of parchment paper directly on the surface, then wrap the whole pan. This prevents the ganache from developing that slight crust that can occur when exposed to air.
For longer storage, these bars are freezer champions. Cut them into individual squares and wrap each one tightly in plastic wrap, then place the wrapped squares in a freezer-safe container or zip-top bag. They'll maintain their quality for up to 3 months frozen. When you're ready to serve, simply transfer the desired number of bars to the refrigerator overnight. Avoid thawing at room temperature, as this can cause condensation that affects the ganache's appearance.
If you're planning to serve these at a party or potluck, they travel well when kept cold. I recommend transporting them in a cooler with ice packs and cutting them on-site for the freshest appearance. If you need to cut them ahead of time, separate the squares with small pieces of parchment paper to prevent sticking.
One important note: these bars are best served chilled. If they sit out at room temperature for more than 30 minutes, the layers can begin to soften too much, making them messy to eat. On hot days, consider serving them on a chilled platter or even placing the serving plate over a larger tray filled with ice.
Frequently Asked Questions
Absolutely! While homemade caramel has superior flavor, you can substitute with a high-quality store-bought caramel sauce. Look for one that's thick and not too sweet—dulce de leche works well too. You'll need about 3/4 cup. Warm it slightly so it's pourable, and stir in 1/2 teaspoon of sea salt to achieve that perfect sweet-salty balance.
Those white streaks indicate your ganache has seized, usually due to temperature shock or moisture. To prevent this, ensure your cream is hot but not boiling, and pour it over the chocolate in a steady stream. Let it sit for 2 minutes before stirring. If it does seize, you can often rescue it by adding a tablespoon of hot cream and whisking vigorously, or warming it gently over a double boiler while stirring constantly.
Yes, with some modifications. Use vegan cream cheese, coconut cream instead of heavy cream, and dairy-free chocolate. The caramel can be made with coconut milk instead of dairy cream. Keep in mind that the flavor profile will change—the coconut cream adds a tropical note that some people love. For the crust, use coconut oil instead of butter. The texture will be slightly different but still delicious.
The key is pressing the crust firmly enough and using the right amount of butter. Your crust mixture should hold together when you squeeze a handful. If it's too dry, add melted butter a teaspoon at a time. Press it down using the bottom of a measuring cup or glass, making sure to compact it evenly across the bottom and slightly up the sides. Chilling for at least 20 minutes before adding the caramel helps it set properly.
Each layer needs to be properly set before adding the next. After pouring the caramel, chill for a full 30 minutes until it's firm to the touch. When adding the cheesecake layer, drop spoonfuls across the caramel first, then gently spread with an offset spatula. Don't spread back and forth—use a gentle pushing motion. The ganache should be slightly cooled but still pourable. If it's too hot, it will melt the cheesecake layer.
Absolutely! This recipe doubles beautifully. Use a 9x13-inch pan instead of the square pan, and increase all ingredients proportionally. You'll need to increase the chilling time slightly—plan for at least 8 hours or overnight. The bars will be slightly thicker, so you might want to cut them into smaller squares since they're quite rich. All the steps remain exactly the same.

Indulgent Chocolate and Salted Caramel Cheesecake Bars That are No Bake
Ingredients
Instructions
- Prepare the crust: Line a 9-inch square pan with parchment paper. Process cookies into fine crumbs, mix with melted butter, and press firmly into the pan. Chill while making caramel.
- Make the caramel: Melt sugar until amber, whisk in butter, then cream, and salt. Cool 5 minutes before pouring over crust. Chill 30 minutes.
- Prepare cheesecake: Beat cream cheese until fluffy, add powdered sugar and vanilla. Whip cream to stiff peaks, fold into cream cheese mixture.
- Assemble: Spread cheesecake mixture over caramel layer, smoothing the top. Chill while making ganache.
- Make ganache: Pour hot cream over chocolate, let stand 2 minutes, then whisk until smooth. Cool 5 minutes before pouring over cheesecake.
- Chill and serve: Cover and refrigerate at least 6 hours or overnight. Cut into squares with a hot, dry knife for clean cuts.
Recipe Notes
For clean cuts, heat your knife under hot water, wipe dry, and cut in one smooth motion. Bars can be frozen for up to 3 months—wrap individually and thaw overnight in the refrigerator.