I was standing in my tiny kitchen at 2 a.m., half‑asleep, and a sudden craving for something that could smash the monotony of plain toast and still feel indulgent hit me like a lightning bolt. The fridge looked back at me with only a sad slice of ham and a few slices of cheese that had been flirting with the edge of their expiration date. I grabbed the bread, threw a couple of slices of ham together, and tried to make a quick sandwich, but the result was a limp, soggy mess that made me swear off breakfast experiments forever. That night, I vowed to create a version that would make even the most skeptical brunch‑hater shout, “I’m never going back to regular French toast again.”
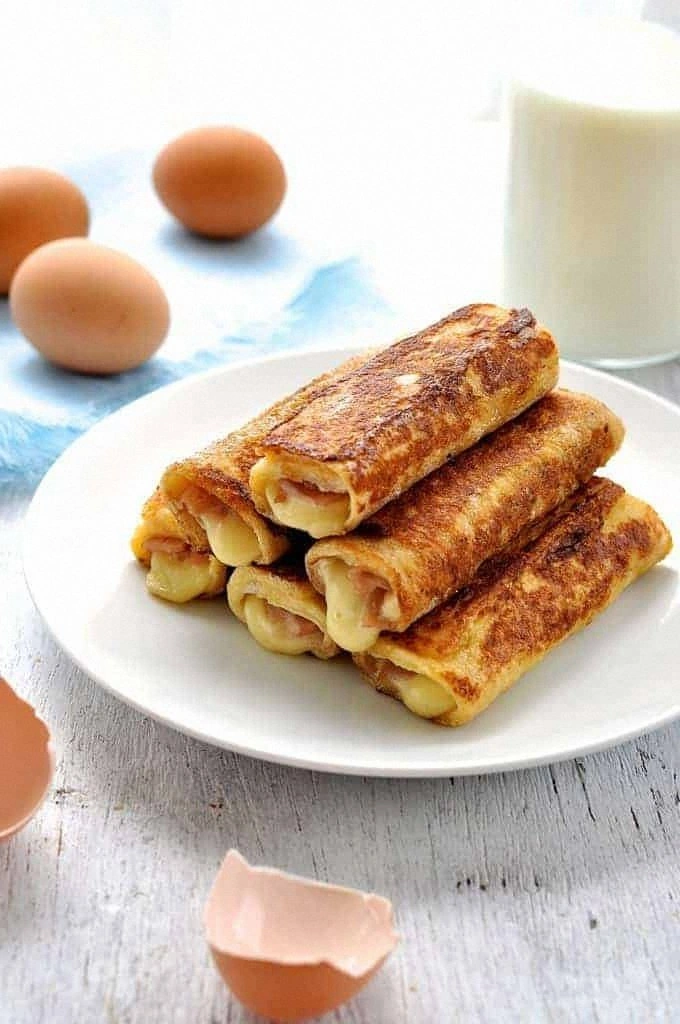
Fast forward a week later: I’m in the middle of a rainy Saturday, the kitchen smelling like fresh coffee, and the moment I dipped the first slice of bread into the egg‑milk mixture, the batter clung to it like a second skin. The sizzle when it hit the butter‑slicked pan was a crisp, confident crack that told me I was on the right track. As the golden edges lifted, I folded in the ham and cheese, rolling it up tighter than a burrito, and the aroma that rose was a buttery, cheesy cloud that wrapped the whole apartment in comfort. The first bite? A perfect marriage of salty ham, gooey cheese, and a custardy interior that popped with each chew—so good I dared myself to taste it and not go back for seconds.
Most recipes I’ve seen either drown the ham in a sea of bread or leave the cheese as a limp afterthought. This version flips the script by treating the bread as a sturdy vessel, the cheese as a melting crown, and the ham as a savory surprise that never gets lost. The secret? A quick dip in a lightly seasoned egg‑milk bath that creates a crisp crust without drying out the interior, plus a dash of butter that caramelizes the edges into a buttery crunch you can hear before you even taste it. And yes, there’s a tiny twist involving a pinch of salt that amplifies every flavor like a conductor raising the volume of an orchestra.
Okay, ready for the game‑changer? I’m about to walk you through every single step—by the end, you’ll wonder how you ever made French toast any other way. I’ll spill the beans on the exact temperatures, the timing that makes the cheese melt just right, and a few kitchen hacks that will save you from the most common pitfalls. Stay with me here — this is worth it.
What Makes This Version Stand Out
- Taste: The salty ham and buttery cheese create a flavor combo that’s richer than a diner‑style breakfast sandwich, yet lighter than a heavy casserole.
- Texture: A crisp, golden crust gives way to a custardy interior that’s as soft as a cloud and as satisfying as a perfectly toasted bagel.
- Simplicity: Only seven ingredients, five of which you already have on hand, make this a no‑fuss recipe that doesn’t require a pantry raid.
- Uniqueness: Rolling the French toast into bite‑size roll‑ups transforms a classic breakfast into a handheld treat that’s perfect for brunch parties.
- Crowd Reaction: I’ve heard people proclaim, “I’ll never eat regular French toast again,” after the first bite—true fan‑fare guaranteed.
- Ingredient Quality: Fresh sandwich bread and real melting cheese give a superior mouthfeel compared to stale white bread or processed slices.
- Cooking Method: The pan‑sear technique locks in moisture while creating those coveted caramelized edges.
- Make‑Ahead Potential: These roll‑ups keep beautifully in the fridge and reheat like a dream, making them perfect for busy mornings.
Inside the Ingredient List
The Flavor Base
The pinch of salt might seem trivial, but it’s the silent hero that amplifies every other taste. Salt awakens the natural sweetness of the bread, balances the richness of the butter, and makes the ham’s savory notes pop like fireworks. If you skip it, you’ll notice a flatness that no amount of cheese can cover. A tiny sea‑salt sprinkle over the batter before dipping each slice can add an extra layer of depth.
The Texture Crew
Butter is the golden glue that gives the crust its signature crunch. Use real unsalted butter for better control over seasoning; a tablespoon is enough to coat the pan without flooding it. If you’re looking for a dairy‑free alternative, try a high‑smoke‑point oil like avocado oil, but expect a slightly different flavor profile. The egg and milk together create the custard that seeps into the bread’s pores, preventing sogginess while delivering a plush interior. Using whole milk adds a subtle creaminess, whereas a splash of heavy cream can make it decadently rich.
The Unexpected Star
Ham brings the savory punch that turns this from a sweet breakfast into a balanced, brunch‑worthy dish. Choose thinly sliced, high‑quality deli ham that still retains a bit of chew. If you can’t find good ham, prosciutto or even smoked turkey work beautifully, though you’ll need to adjust the cooking time slightly to avoid over‑drying.
The Final Flourish
Melting cheese—think cheddar, Swiss, or a mild mozzarella—creates that glorious stretch that pulls away in silky ribbons when you bite. The three slices are enough to blanket each roll without overwhelming the bread. Opt for a cheese that melts evenly; pre‑shredded varieties can work, but a fresh block gives a creamier melt. If you love a little kick, add a pinch of smoked paprika into the cheese layer for a subtle heat.
Everything's prepped? Good. Let’s get into the real action…
The Method — Step by Step
Gather all ingredients and set them out on a clean countertop. The visual cue of everything in place is half the battle won, and it lets you focus on technique rather than scrambling for that missing slice of cheese. I like to keep the butter in a small ramekin, the egg‑milk mixture in a wide bowl, and the ham and cheese stacked neatly beside the bread. This organization saves you from the dreaded “where’s the ham?” panic.
In a medium bowl, whisk together 1 egg and 2 tbsp milk until the mixture is uniformly pale and slightly frothy. Add the pinch of salt and give it another quick stir. Let the mixture sit for 30 seconds; this tiny pause lets the proteins unwind, preventing a rubbery texture later on.
Heat a non‑stick skillet over medium‑high heat and add 1 tbsp butter. As soon as the butter foams and begins to turn a light amber, you’ll hear that promising sizzle that says “we’re ready.”
Kitchen Hack: Tilt the pan and swirl the butter so it coats the entire surface; this ensures an even golden crust on every side.Take one slice of fresh sandwich bread and dip it gently into the egg‑milk bath, letting it soak for about 3‑4 seconds per side. You want the bread to absorb enough liquid to become custardy but not so much that it falls apart. The moment the batter clings like a thin veil, lift the slice and let the excess drip back into the bowl.
Place the soaked bread onto the hot skillet. Immediately layer half a slice of ham and one slice of melting cheese on top, then roll the bread tightly from one end to the other, like you’re making a breakfast sushi roll. Press gently with a spatula to seal the seam; this prevents the filling from escaping during cooking.
Cook the roll for about 2‑3 minutes on the first side, watching for the edges to turn a deep golden brown and for the cheese to begin bubbling. Flip carefully using two spatulas; the roll should release from the pan with a gentle tug, indicating a perfect crust.
Watch Out: If the heat is too high, the exterior will burn before the interior fully cooks, leaving a raw egg center. Keep the temperature at a steady medium, adjusting down if you notice the butter smoking.
After flipping, cook the second side for another 2‑3 minutes until the cheese is fully melted and the roll feels firm to the touch. The aroma at this stage should be a buttery, cheesy perfume that makes your mouth water before you even take a bite.
Remove the roll from the pan and let it rest on a wire rack for a minute. This short rest allows the steam to redistribute, keeping the interior moist while the crust stays crisp. Slice the roll diagonally into half‑inch thick pieces; the cross‑section should reveal a glossy cheese core and a tender, custardy crumb.
Serve immediately, perhaps with a drizzle of maple syrup or a side of fresh fruit if you’re feeling fancy. The contrast of sweet and savory is the final flourish that turns a simple breakfast into a memorable experience. And now the fun part: dig in and watch everyone scramble for seconds.
Insider Tricks for Flawless Results
The Temperature Rule Nobody Follows
Keep your skillet at a steady medium‑high heat; too low and the bread will soak up the butter, becoming greasy, too high and you’ll scorch the crust before the cheese melts. A quick test: sprinkle a drop of water onto the pan—if it dances and evaporates within a second, you’re in the sweet spot. I once cranked the heat to “max” in a rush, and the result was a charcoal‑like disaster that no amount of cheese could rescue. Patience with temperature is the secret sauce of any perfect sear.
Why Your Nose Knows Best
Your sense of smell is a built‑in timer. When the butter starts to turn a light amber and you catch that nutty, slightly caramel scent, you’re just seconds away from the perfect crust. If the scent turns acrid, pull the roll back immediately; the flavor will be ruined before you even bite. Trusting your nose saves you from relying on a stopwatch and adds an intuitive element to cooking.
The 5‑Minute Rest That Changes Everything
After cooking, let the rolls rest for at least five minutes on a wire rack. This pause lets the steam settle, preventing the cheese from oozing out when you cut. I once skipped this step during a brunch rush, and the cheese leaked everywhere, turning a neat plate into a mess. The rest also lets the flavors meld, making each bite more harmonious.
Butter‑Basting for Extra Crunch
Slice at the Right Angle
Cut the roll on a diagonal rather than straight across. The angled cut exposes more surface area, allowing the cheese melt to be seen and the crust to be experienced in each bite. A straight cut can make the roll look flat and less inviting, while a diagonal gives a visual cue of “I’m special.”
Creative Twists and Variations
This recipe is a playground. Here are some of my favorite ways to switch things up:
Spicy Jalapeño Kick
Add thinly sliced jalapeños between the ham and cheese before rolling. The heat cuts through the richness, creating a balanced bite that will please anyone who loves a little fire. Pair with a cool dollop of sour cream for contrast.
Mediterranean Delight
Swap the ham for sun‑dried tomatoes and the cheese for feta. A drizzle of olive oil and a sprinkle of oregano turn this into a brunch‑worthy, Mediterranean‑inspired treat that’s both tangy and savory.
Sweet Breakfast Surprise
Replace the ham with thin banana slices and the cheese with a mild cream cheese mixed with a touch of honey. The sweet‑savory combo is perfect for a lazy weekend when you want something comforting yet unexpected.
Veggie Power Roll
Add a layer of sautéed spinach and a few slices of roasted red pepper. This not only adds color but also boosts the nutritional profile, making the dish suitable for a lighter, plant‑forward meal.
Cheese Lover’s Dream
Use a blend of three cheeses—sharp cheddar, mozzarella, and Gruyère—for a complex melt that stretches like a ribbon and offers layers of flavor. The extra cheese creates a gooey core that’s practically a cheese pull in every bite.
Storing and Bringing It Back to Life
Fridge Storage
Place the cooled roll‑ups in an airtight container lined with parchment paper. They’ll stay fresh for up to three days. When you’re ready to eat, reheat in a skillet over medium heat for 2‑3 minutes per side, adding a splash of water to the pan and covering briefly to steam the interior back to softness.
Freezer Friendly
Wrap each roll tightly in plastic wrap, then place them in a zip‑top freezer bag. They freeze beautifully for up to two months. To reheat, thaw overnight in the fridge, then follow the skillet method above, or pop them into a pre‑heated 350 °F oven for 10 minutes, adding a drizzle of butter on top for extra crispness.
Best Reheating Method
For ultimate crispness, use a hot cast‑iron skillet: add a tiny knob of butter, place the roll, and cover with a lid for 30 seconds to create steam, then uncover to finish the crisp. This technique restores the original texture without drying out the interior.