I remember the night I tried to make a quick dinner for my roommate and the kitchen looked like a war zone. The dough was sticky, the filling was too dry, and the pie crust collapsed into a sad, soggy mess that made me question every culinary decision I had ever made. That disaster was the catalyst for a culinary obsession that would lead me to discover the most satisfying Chinese meat pie you’ll ever taste. I’m talking about a pie that balances flaky, buttery crust with a savory, umami-packed filling that melts in your mouth. And it’s not just a pie; it’s an experience that turns a simple meal into a celebration.
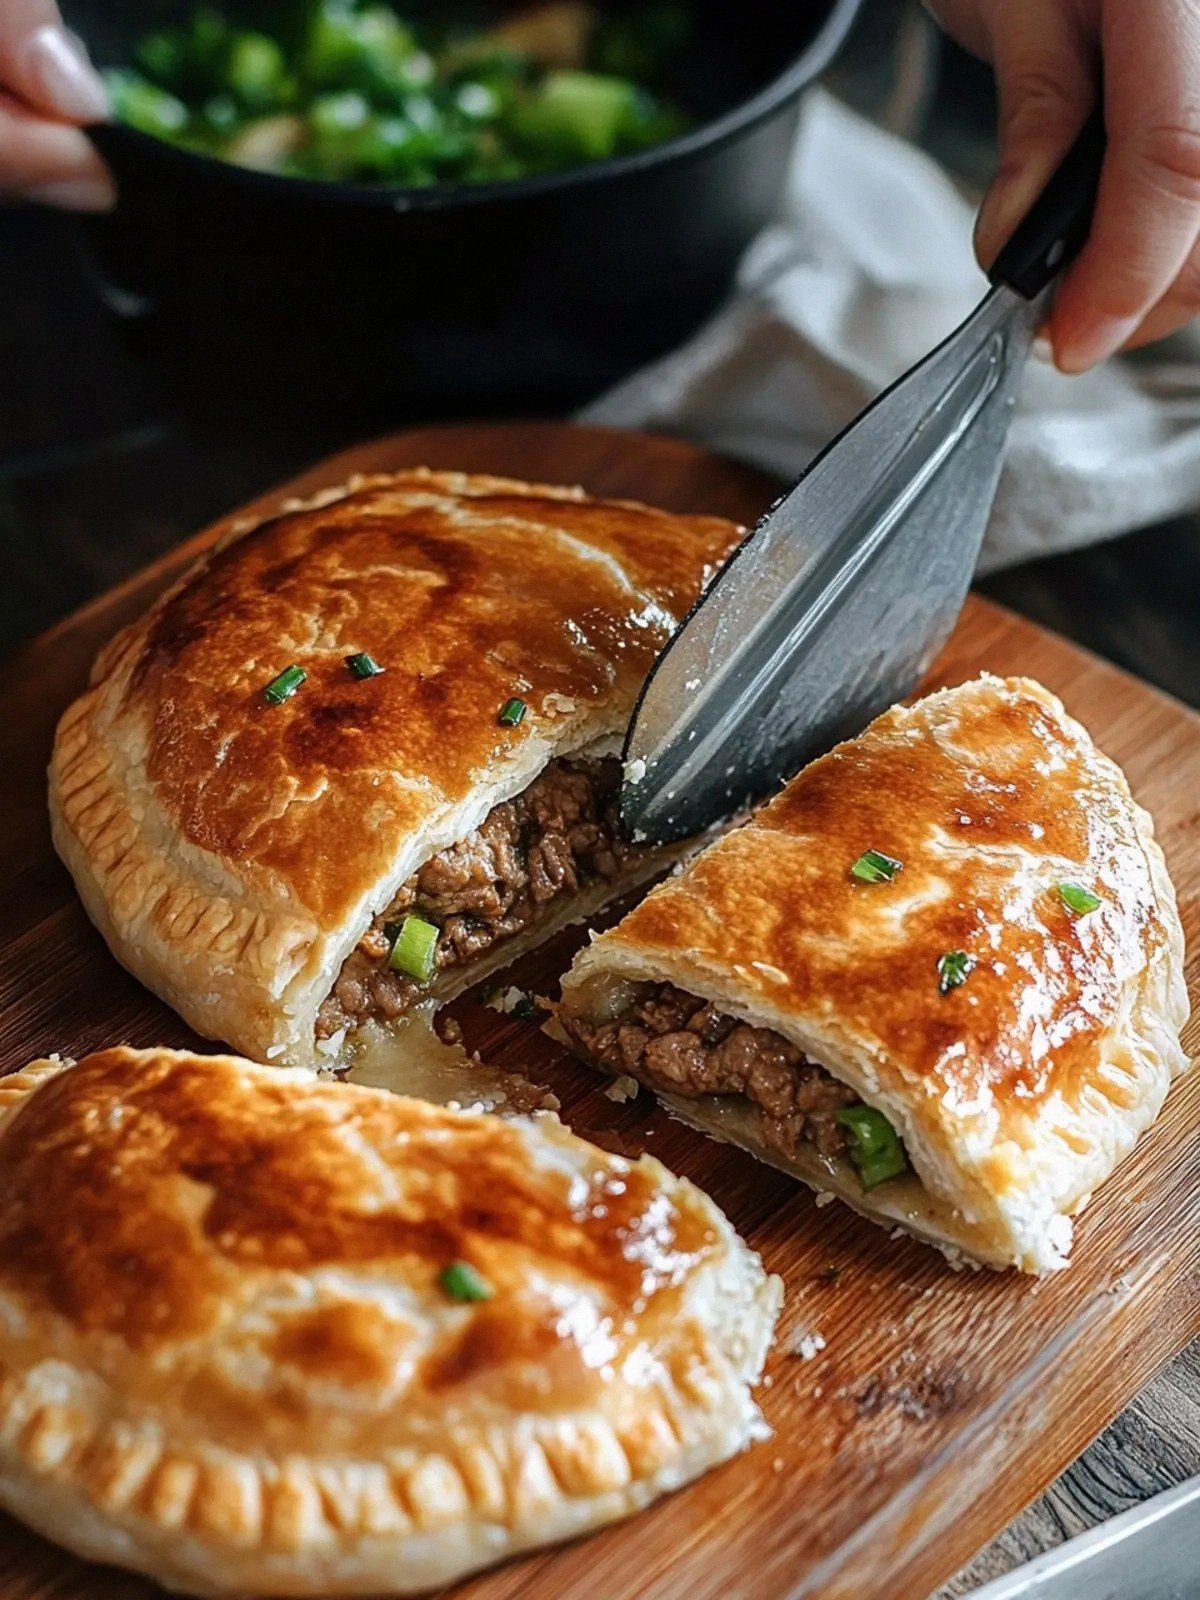
Picture this: you pull a golden, steam‑bubbling pie out of the oven, the aroma of soy, garlic, and scallions filling the kitchen like a fragrant hug. The first bite is a crisp, buttery bite that gives way to a burst of savory pork, sweet hints of sugar, and a subtle warmth from five‑spice. The texture is a dance—crisp edges that crackle like thin ice, a tender center that drips with sauce, and scallions that add a bright, almost citrusy finish. The flavors mingle like a well‑orchestrated symphony, each note perfectly balanced, leaving you craving a second slice before you even finish the first.
What sets this version apart is not just the recipe itself but the way it was engineered to work with everyday kitchen tools and pantry staples. I’ve spent hours tweaking the dough to achieve that ideal flakiness without the need for a stand mixer, and I’ve perfected the filling to keep it juicy without the extra grease. The result? A pie that’s both restaurant‑quality and home‑friendly, ready in under an hour, and a crowd‑pleaser that will make your friends ask for the recipe. I dare you to taste this and not go back for seconds. Trust me, this is hands down the best version you’ll ever make at home.
If you’ve ever struggled with flaky crusts, uneven fillings, or just plain boring pies, you’re not alone—and I’ve got the fix. This recipe is a game‑changer: it’s simple, it’s delicious, and it’s built to scale. Picture yourself pulling this out of the oven, the whole kitchen smelling incredible, and guests lining up for that first bite. Let me walk you through every single step—by the end, you’ll wonder how you ever made it any other way.
What Makes This Version Stand Out
- Flavor: The combination of light and dark soy sauces, Shaoxing wine, and a dash of five‑spice creates a depth that feels both familiar and exotic, turning a humble meat pie into a passport to China.
- Texture: The dough is crafted to be light yet sturdy, offering a flaky, buttery bite that doesn’t crumble, while the filling remains moist and juicy, thanks to the careful balance of liquids.
- Ease: No fancy equipment required—everything can be done with a skillet, a mixing bowl, and a rolling pin, making it approachable for beginners and seasoned cooks alike.
- Uniqueness: The subtle sweetness from sugar and the aromatic touch of scallions elevate the dish beyond typical meat pies, giving it a memorable finish.
- Crowd‑Pleaser: Whether served as an appetizer or a main, this pie garners rave reviews. It’s the kind of dish that turns a casual dinner into a memorable event.
- Ingredient Quality: Using fresh, high‑quality pork and fresh scallions ensures the flavor shines through, while the neutral oil keeps the dough moist without overpowering.
- Make‑Ahead: You can assemble the pies ahead of time, refrigerate, and bake them later without compromising quality—a boon for busy weeknights.
Alright, let's break down exactly what goes into this masterpiece...
Inside the Ingredient List
The Flavor Base
The foundation of this pie’s savory profile starts with the pork filling. Ground pork is the star—its natural fat content keeps the filling moist, while the leaner cut keeps the dish from becoming greasy. Light soy sauce adds a subtle saltiness, whereas dark soy sauce deepens the color and gives a richer, slightly sweet undertone. Shaoxing wine, a staple in Chinese kitchens, infuses a mellow, nutty aroma that elevates the overall depth. If you can’t find Shaoxing wine, dry sherry or rice wine can be a close substitute, but the flavor profile will shift slightly.
Sugar isn’t just a sweetener here; it balances the umami and helps caramelize the surface of the filling, giving it a glossy finish that’s impossible to resist. A pinch of five‑spice powder adds warmth and complexity—think star anise, cinnamon, cloves, Sichuan pepper, and fennel seed—creating a fragrant backdrop that lingers on the palate. The neutral oil is the unsung hero; it keeps the dough tender and prevents sticking, while also allowing the soy sauce and wine to mingle without a strong oil flavor. Finally, scallions add a bright, fresh note that cuts through the richness, ensuring each bite is balanced.
The Texture Crew
The dough’s texture hinges on the right ratio of flour to water. All‑purpose flour is the workhorse—its protein content provides structure without becoming tough. Boiling water is used to create a slightly denser dough, which helps it hold its shape when folded. Room temperature water softens the dough, making it easier to roll out and preventing cracks. The 3 cups of flour might seem like a lot, but when combined with the right amount of water, it yields a supple dough that’s easy to handle.
The neutral oil is added to the dough to keep it moist and tender. It also helps create a flaky crust by separating the layers of dough as it bakes. If you’re looking for a healthier alternative, you could use a small amount of unsalted butter, but be aware that the flavor profile will shift slightly towards a richer, buttery taste.
The Unexpected Star
Scallions are more than just a garnish; they’re a flavor cornerstone. The green parts provide a subtle sharpness, while the white parts bring a mild, onion‑like sweetness. When finely chopped and folded into the filling, they release their essential oils, adding a fresh brightness that balances the richness of the pork. If you can’t find scallions, finely diced green onions or even a splash of fresh lime juice can mimic the bright finish.
The Final Flourish
The finishing touch is the final bake. The oven’s heat creates a golden crust that’s crisp on the outside but still tender inside. The steam generated by the water in the dough keeps the interior moist, preventing the filling from drying out. A quick brush of neutral oil before baking can give the crust an extra shine. Once out of the oven, a sprinkle of fresh scallions adds a fresh, aromatic finish that lingers long after the last bite.
Everything's prepped? Good. Let's get into the real action...
The Method — Step by Step
- Begin by mixing the ground pork with light soy sauce, dark soy sauce, Shaoxing wine, sugar, salt, and five‑spice powder in a large bowl. Stir until the mixture is glossy and the liquids are fully incorporated. This step is crucial for flavor; don't rush it. Let the mixture rest for about 10 minutes to allow the flavors to meld.
- In a separate bowl, combine the all‑purpose flour with boiling water. Mix until a shaggy dough forms. The hot water partially gelatinizes the starch, giving the dough a slightly sticky feel that helps it develop a tender crumb. Once the dough is cool enough to handle, add the room temperature water and neutral oil, kneading until smooth. This should take about 5 minutes; the dough should be elastic but not overly stiff.
- Divide the dough into 8 equal portions, rolling each into a ball. Cover with a damp cloth and let rest for 15 minutes. This relaxation period allows the gluten to relax, making the dough easier to roll out and preventing it from shrinking during baking.
- On a lightly floured surface, roll each dough ball into a 6‑inch circle, about 1/8 inch thick. Pat the dough into a small ramekin or pie tin, pressing the edges to seal. The dough should be snug but not overly tight; you want the filling to rise freely. This is where the dough’s elasticity truly shines.
- Fill each crust with about 1/4 cup of the seasoned pork mixture. Spread it evenly, leaving a small margin around the edges. Sprinkle finely chopped scallions over the filling to add brightness and aroma. The scallions will soften slightly during baking, releasing their essential oils.
- Fold the edges of the dough over the filling, pinching to seal. You can create a simple pleated edge or a decorative lattice if you’re feeling fancy. The seal ensures the juices stay inside and the crust stays intact. Let the pies rest for 5 minutes before baking; this helps the seal set.
- Place the pies on a parchment‑lined baking sheet and bake for 25–30 minutes, or until the crust is golden brown and the filling is bubbling. The oven’s heat should create a crisp, flaky crust that gives way to a juicy interior. Keep an eye on the pies; if the edges brown too quickly, tent them with foil.
- Remove the pies from the oven and let them rest for 5 minutes before serving. Resting allows the juices to redistribute, ensuring each bite is perfectly moist. Serve hot, accompanied by a side of pickled vegetables or a simple cucumber salad to cut through the richness.
That’s it — you did it. But hold on, I've got a few more tricks that'll take this to another level...
Insider Tricks for Flawless Results
The Temperature Rule Nobody Follows
Many cooks bake at a high temperature to get a crispy crust, but this can cause the filling to dry out. I’ve found that baking at 375°F (190°C) strikes the perfect balance, allowing the dough to rise and brown while keeping the pork moist. If you’re using a convection oven, lower the temperature by 25°F to avoid over‑browning.
Why Your Nose Knows Best
The moment the pie starts to bake, you’ll notice a sweet, savory aroma that signals the filling is cooking just right. Trust your nose; if it smells toasty and slightly caramelized, you’re on the right track. If it smells overly greasy, give the pies a quick brush of neutral oil before the final minutes.
The 5‑Minute Rest That Changes Everything
After baking, let the pies rest for at least five minutes. This pause allows the juices to redistribute, preventing a dry center. I’ve seen many people skip this step, resulting in a soggy crust and unevenly cooked filling. The rest period is simple but essential.
Seal the Edges Like a Pro
When sealing the edges, press the dough firmly and then pinch the seam. A tight seal prevents the filling from leaking, which can cause a messy oven and uneven cooking. If you’re a fan of decorative crusts, use a fork to criss‑cross the edges before sealing for a classic look.
Make‑Ahead Magic
You can assemble the pies a day ahead, refrigerate them, and bake them fresh when you’re ready. Cover the assembled pies with plastic wrap and store them in the fridge. When you’re ready to bake, let them sit at room temperature for 10 minutes, then proceed with the baking step. The dough will still rise, and the flavors will deepen.
Creative Twists and Variations
This recipe is a playground. Here are some of my favorite ways to switch things up:
Spicy Sichuan Twist
Add a tablespoon of Sichuan peppercorns to the pork mixture for a numbing, spicy kick. Pair with a drizzle of chili oil on top before baking. This version is perfect for heat lovers and pairs beautifully with a cool cucumber salad.
Vegetarian Version
Replace the pork with finely chopped shiitake mushrooms and diced carrots. Use vegetable broth instead of water and add a splash of soy sauce. The earthy mushroom flavor complements the five‑spice beautifully, creating a hearty vegetarian pie.
Cheesy Surprise
Fold in half a cup of shredded mozzarella into the filling before sealing. The cheese melts into a gooey center, adding a comforting, melty texture that pairs well with the savory pork.
Herb‑Infused Delight
Add a handful of chopped fresh cilantro or basil to the filling for a fresh, herbal note. This brightens the dish and adds a layer of complexity that’s especially refreshing on a hot day.
Sweet and Savory Fusion
Incorporate a tablespoon of hoisin sauce into the pork mixture for a sweet, tangy glaze. The hoisin caramelizes during baking, creating a glossy, flavorful crust that’s hard to resist.
Gluten‑Free Adaptation
Use a gluten‑free all‑purpose flour blend in place of regular flour, and add a tablespoon of xanthan gum to improve elasticity. The dough will still yield a flaky crust, and the filling remains unchanged.
Storing and Bringing It Back to Life
Fridge Storage
Store uncooked pies in an airtight container in the refrigerator for up to 48 hours. For cooked pies, place them in a shallow container, cover loosely with foil, and refrigerate for up to 3 days. The crust will stay firm, and the filling will retain moisture.
Freezer Friendly
Wrap each pie tightly in plastic wrap, then place in a freezer bag. They can be frozen for up to 3 months. When ready to bake, let them thaw in the refrigerator overnight, then bake as directed.
Best Reheating Method
To reheat, pre‑heat the oven to 350°F (175°C). Place the pie on a parchment‑lined sheet, cover with foil, and heat for 15–20 minutes. Add a splash of water before reheating to keep the crust from drying out. The result is a freshly baked pie with a crisp crust and juicy filling.