I still remember the first time I attempted chocolate mousse. It was a disaster of epic proportions—grainy, deflated, and tasting vaguely of scrambled eggs. My dinner guests politely picked at it while I silently plotted my escape from the table. But that humiliation sparked an obsession. For months, I tested every technique, every ratio, every ancient French secret I could dig up. I became the Goldilocks of chocolate mousse, searching for that perfect balance of airy lightness and rich intensity.
Picture this: it's midnight in my tiny apartment kitchen. The windows are fogged with steam, my favorite jazz record is playing, and I'm whisking egg whites like my life depends on it. The scent of melting chocolate fills the air—that deep, intoxicating aroma that makes you forget every diet you've ever started. My roommate wanders in, drawn by the smell, and I hand her a spoonful of my latest attempt. Her eyes go wide. "This is it," she whispers. "This is the one."
That night, I cracked the code. The secret isn't just in the technique—though technique matters—it's in understanding how each ingredient contributes to the final texture. It's knowing exactly when to fold, how long to whip, and why that tiny pinch of salt makes all the difference between good and absolutely transcendent.
What I'm sharing with you today isn't just another chocolate mousse recipe. This is the culmination of dozens of trials, countless failures, and one spectacular success that's become my signature dessert. The mousse is so light it practically floats off the spoon, yet so intensely chocolatey that it satisfies even the most demanding chocoholic. And when you serve it in individual cups with a crisp chocolate shell? Pure magic. Let me walk you through every single step—by the end, you'll wonder how you ever made it any other way.
What Makes This Version Stand Out
This isn't your average chocolate mousse that collapses into a puddle or tastes like chocolate-flavored air. This is the mousse that made my pastry chef friend ask for the recipe. The version that has my sister-in-law claiming I should open a dessert bar. Here's why it beats every other recipe out there:
- Triple Chocolate: We use both bittersweet and semi-sweet chocolate for complexity, plus cocoa powder for that extra depth. It's like a chocolate symphony in your mouth—each note plays off the others.
- Cloud-Like Texture: Through a specific folding technique, we achieve a texture so light it defies gravity. The bubbles are so perfectly distributed that they create a mousse that holds its shape for hours without being dense or heavy.
- Zero Gelatin: Most mousse recipes rely on gelatin for stability, but this version uses only the natural structure of eggs and cream. The result? A cleaner flavor that lets the chocolate sing.
- Make-Ahead Magic: Unlike fussy desserts that must be served immediately, these cups actually improve after a few hours in the fridge. The flavors meld and deepen, making them perfect for dinner parties.
- Chocolate Shell Innovation: The chocolate cup isn't just for show—it provides a textural contrast that elevates the entire experience. That first crack as your spoon breaks through is pure satisfaction.
- Foolproof Technique: I've eliminated the guesswork with precise temperatures and timing. Even if you've never made mousse before, you'll nail this on the first try.
- Ingredient Flexibility: While I recommend specific brands, this recipe works beautifully with whatever chocolate you can find at your local store. No need to order fancy imports.
Alright, let's break down exactly what goes into this masterpiece...
Inside the Ingredient List
The Flavor Base
Bittersweet chocolate is the backbone here—I'm talking about chocolate with 70-75% cacao content. This isn't the time for milk chocolate or even semi-sweet chips. The higher cacao percentage gives us that intense, sophisticated flavor that makes grown adults close their eyes and sigh with pleasure. When you melt it properly, it transforms into a glossy pool of liquid velvet that forms the soul of our mousse.
But here's where most recipes go wrong—they stop at one type of chocolate. We're adding semi-sweet chocolate to our shell for a reason. It melts more smoothly than bittersweet, creating that perfect snap when you bite into the cup. The combination of the two chocolates creates a flavor journey: first the bright, slightly fruity notes of the semi-sweet, then the deep, complex bitterness of the mousse.
The Texture Crew
Eggs are the unsung heroes of mousse. The yolks create richness and help emulsify the chocolate, while the whipped whites provide the lift that makes this dessert feel like eating a chocolate cloud. The key is treating them right—no traces of yolk in your whites, or they'll never whip properly. And don't even think about using older eggs; fresh eggs have stronger protein structures that trap air better.
Heavy cream does double duty here. We whip some of it to fold into our mousse for extra lightness, but we also use a small amount unwhipped to help loosen the chocolate mixture. The fat content matters—look for cream with at least 36% fat. Anything less won't whip properly or provide the stability we need.
The Unexpected Star
That quarter teaspoon of salt isn't optional, folks. Salt in chocolate desserts is like bass in music—you don't always notice it when it's there, but you definitely miss it when it's gone. It amplifies the chocolate flavor, making it taste more chocolatey than chocolate itself. I use flaky sea salt because it dissolves more gradually, distributing evenly throughout the mousse.
Vanilla extract might seem redundant when you're already using chocolate, but it adds a floral note that rounds out the flavor profile. Don't use imitation vanilla here—that artificial taste will stand out like a sore thumb against the pure chocolate. A good quality extract or even vanilla bean paste will make you understand why this ingredient has been prized for centuries.
The Final Flourish
Vegetable shortening in our chocolate shell is controversial, I know. Traditionalists will tell you to use only chocolate, but hear me out. A tablespoon of shortening creates a smoother, glossier finish that doesn't crack when you unmold the cups. It also helps the chocolate contract slightly as it cools, making removal from the molds effortless. If you're morally opposed to shortening, you can use coconut oil, but the texture won't be quite as perfect.
Everything's prepped? Good. Let's get into the real action...
The Method — Step by Step
- Start with the chocolate shell. Melt your semi-sweet chocolate with the shortening using a double boiler. Don't have one? Set a heatproof bowl over a pot of simmering water, making sure the bottom doesn't touch the water. Stir constantly with a rubber spatula, watching as the chocolate transforms from solid chunks to a smooth, glossy liquid. The smell should fill your kitchen with that intoxicating aroma that makes time slow down.
- Prepare your molds. I use silicone muffin cups because they're flexible and make unmolding a breeze, but you can use regular muffin tins lined with paper cups. The key is to coat them with a thin, even layer of chocolate. Too thick and the shell will be hard to crack through; too thin and it might break when you remove it. Hold the mold at an angle and use a pastry brush to paint the chocolate up the sides, rotating as you go.
- Let the magic happen. Refrigerate your chocolate shells for at least 30 minutes. This is when the chocolate undergoes tempering—forming that perfect crystal structure that gives us the satisfying snap. You'll know they're ready when the chocolate has lost its glossy sheen and looks slightly matte. If you're impatient like me, you'll keep checking, but trust the process.
- Separate your eggs like a pro. Crack each egg and pass the yolk back and forth between the shell halves, letting the white fall into a clean bowl. Even a speck of yolk will prevent your whites from whipping properly. I separate them one at a time into a small bowl, then transfer the white to my mixing bowl. This way, if I mess up one, I haven't ruined the whole batch. The yolks go into another bowl where they'll wait for their moment to shine.
- Whip those whites to perfection. Add a pinch of salt to your egg whites and start whisking on medium speed. When they reach soft peaks—meaning the peaks curl over when you lift the beaters—gradually sprinkle in the sugar. Continue whipping until you get stiff, glossy peaks that hold their shape. The meringue should look like a cloud and feel smooth between your fingers, not grainy from undissolved sugar.
- Create the chocolate base. Melt your bittersweet chocolate using the same double boiler method. Once it's smooth and glossy, remove it from heat and let it cool slightly. If it's too hot when you add the yolks, you'll end up with chocolate scrambled eggs—delicious for breakfast, disaster for dessert. Stir in the vanilla extract and watch as the chocolate becomes even more aromatic.
- The crucial folding technique. Here's where most recipes fail—they stir instead of fold. Add about one-third of your meringue to the chocolate and stir it in thoroughly. This lightens the chocolate and makes it easier to fold in the rest. Now add half the remaining meringue and use a rubber spatula to fold: cut down through the center, scrape along the bottom, and lift up the side, rotating the bowl as you go. Add the final meringue and repeat until just combined—those streaks are okay!
- Whip the cream to soft peaks. In a chilled bowl with chilled beaters (I keep mine in the freezer), whip the cream until it holds soft peaks. It should mound gently when dropped from a spoon. Over-whipped cream will make your mousse heavy, so watch carefully. Fold the whipped cream into your chocolate mixture using the same gentle technique.
- Fill and chill. Spoon or pipe the mousse into your chocolate shells, filling them almost to the top. Tap the molds gently on the counter to release any air bubbles. Cover with plastic wrap and refrigerate for at least 4 hours, preferably overnight. This is when the magic happens—the mousse sets, the flavors meld, and the texture becomes impossibly light.
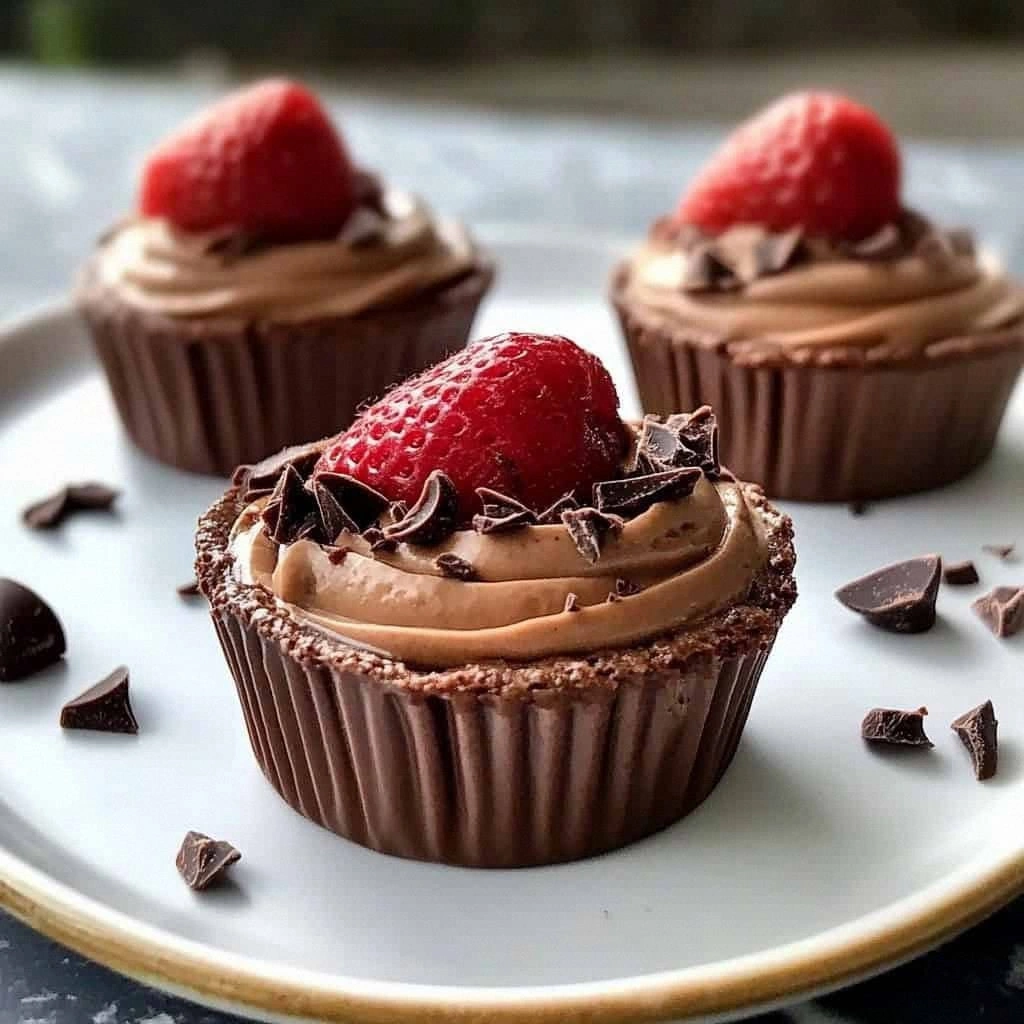
- The grand finale. To unmold, gently peel away the silicone or paper. If using metal tins, warm the bottom briefly by placing it on a warm towel, then invert and tap. The chocolate shell should release with a satisfying crack. Top with whipped cream, fresh raspberries, and chocolate shavings just before serving. Watch your guests' faces as they take their first bite—that moment of pure bliss is worth every minute of effort.
That's it—you did it. But hold on, I've got a few more tricks that'll take this to another level...
Insider Tricks for Flawless Results
The Temperature Rule Nobody Follows
Room temperature isn't just a suggestion—it's the difference between mousse that soars and mousse that sinks. Cold eggs don't whip properly, and hot chocolate cooks your eggs on contact. I let everything sit out for at least an hour before starting. Yes, it requires patience, but the results are worth the wait. If you're in a rush, place eggs in warm (not hot) water for 10 minutes to bring them up to temperature quickly.
Why Your Nose Knows Best
Trust your senses during this process. When melting chocolate, you'll smell when it's just right—that deep, complex aroma that makes your mouth water. If it starts to smell sharp or bitter, you've overheated it. When whipping cream, listen for the change in sound as it thickens. These sensory cues are more reliable than timers once you learn to recognize them.
The 5-Minute Rest That Changes Everything
After you fold in your final meringue, let the mixture rest for exactly 5 minutes before filling your cups. This brief pause allows the foam structure to stabilize, resulting in a mousse that holds its shape better and has a more even texture. I discovered this by accident when my phone rang mid-process, and the batch I left sitting was noticeably better than the ones I rushed.
The Folding Test
Here's how to know if you've folded properly: lift your spatula and let the mixture fall. It should ribbon down in thick, luxurious folds that hold their shape for a moment before disappearing. If it pours like liquid, you've over-folded. If it clumps and breaks, you need to fold a bit more. This sweet spot is where the magic lives.
Storage Secrets
These mousse cups will keep for up to 3 days in the refrigerator, but here's the trick—store them uncovered for the first hour. This prevents condensation from forming on top of your mousse. After an hour, cover loosely with plastic wrap. The chocolate shell protects the mousse from absorbing refrigerator odors while maintaining perfect texture.
The Make-Ahead Miracle
You can prep these up to 2 days ahead, and they actually improve with time. The chocolate flavor develops and deepens, becoming more complex. Just don't add the garnishes until right before serving. Keep them in the back of the fridge where the temperature is most stable, then bring them out 15 minutes before serving—for the best texture experience.
Creative Twists and Variations
This recipe is a playground. Here are some of my favorite ways to switch things up:
Orange Zest Infusion
Add the zest of one orange to your chocolate as it melts, then strain it out before proceeding. The citrus oils infuse the chocolate with a bright, sophisticated note that makes the whole dessert sing. Top with candied orange peel for a professional finish that tastes like something from a Parisian patisserie.
Espresso Explosion
Dissolve 2 teaspoons of instant espresso powder in 1 teaspoon of hot water, then mix it into your melted chocolate. The coffee doesn't overpower—it amplifies the chocolate flavor, making it taste more chocolatey than chocolate itself. If you love mocha, this variation will become your new obsession.
Salted Caramel Swirl
Make a quick caramel sauce by melting 1/2 cup sugar until amber, then whisking in 1/4 cup cream and a pinch of salt. Let it cool slightly, then drizzle ribbons through your mousse before chilling. Each bite becomes a perfect balance of sweet, salty, and intensely chocolatey.
Mint Chocolate Marvel
Add 1/2 teaspoon of peppermint extract to your meringue. Be conservative—peppermint is potent and can easily overwhelm. The result tastes like the most sophisticated version of a peppermint patty you've ever experienced. Garnish with fresh mint leaves for a pop of color and aroma.
Spiced Mexican Chocolate
Add a pinch each of cinnamon and cayenne to your chocolate as it melts. The warmth builds slowly, creating a gentle heat that lingers pleasantly after each bite. Top with cinnamon-dusted whipped cream for a dessert that transports you to a Mexican café.
White Chocolate Contrast
Replace the semi-sweet chocolate in your shells with white chocolate for a stunning visual contrast. The sweet, vanilla-forward shells create an incredible flavor and textural contrast with the dark mousse. It's like having two desserts in one perfect package.
Storing and Bringing It Back to Life
Fridge Storage
These mousse cups are refrigerator superstars. Store them in the coldest part of your fridge, away from strong-smelling foods. The chocolate shell acts as a protective barrier, preventing the mousse from absorbing unwanted flavors. They'll maintain perfect texture for up to 3 days, though they're at their peak within the first 48 hours. Keep them on a flat shelf, not in the door where temperature fluctuations can cause the mousse to weep.
Freezer Friendly
While you can freeze these, I don't recommend it unless absolutely necessary. The texture changes slightly—the mousse becomes denser, and the chocolate shell can develop a white film called bloom. If you must freeze them, wrap each cup individually in plastic wrap, then foil, and use within 2 weeks. Thaw overnight in the refrigerator, still wrapped to prevent condensation from ruining your chocolate shell.
Best Reheating Method
Here's the beautiful thing—these don't need reheating! They're meant to be served cold, straight from the refrigerator. But if your chocolate shell has been in very cold storage and seems too hard, let the cups sit at room temperature for 10-15 minutes before serving. This softens the shell just enough to crack beautifully without being difficult to eat. If you've made whipped cream ahead, give it a quick whisk to restore its fluffiness before dolloping on top.