Picture this: I’m standing in my cramped kitchen, a box of phyllo dough in one hand and a jar of honey in the other, when the doorbell rings. My friend, a self‑proclaimed dessert tyrant, has just challenged me to prove that baklava can be both decadent and effortless. I stared at the flaky sheets, feeling a mix of excitement and dread, because I’ve always been terrified of burning the pastry or ending up with a soggy mess. The moment I tasted the first bite, the kitchen filled with the sweet aroma of honey and toasted nuts, and I knew I’d discovered something special. That instant turned a simple kitchen disaster into a culinary revelation, and I’m here to walk you through every single step so you can make this at home and wonder how you ever did it any other way.
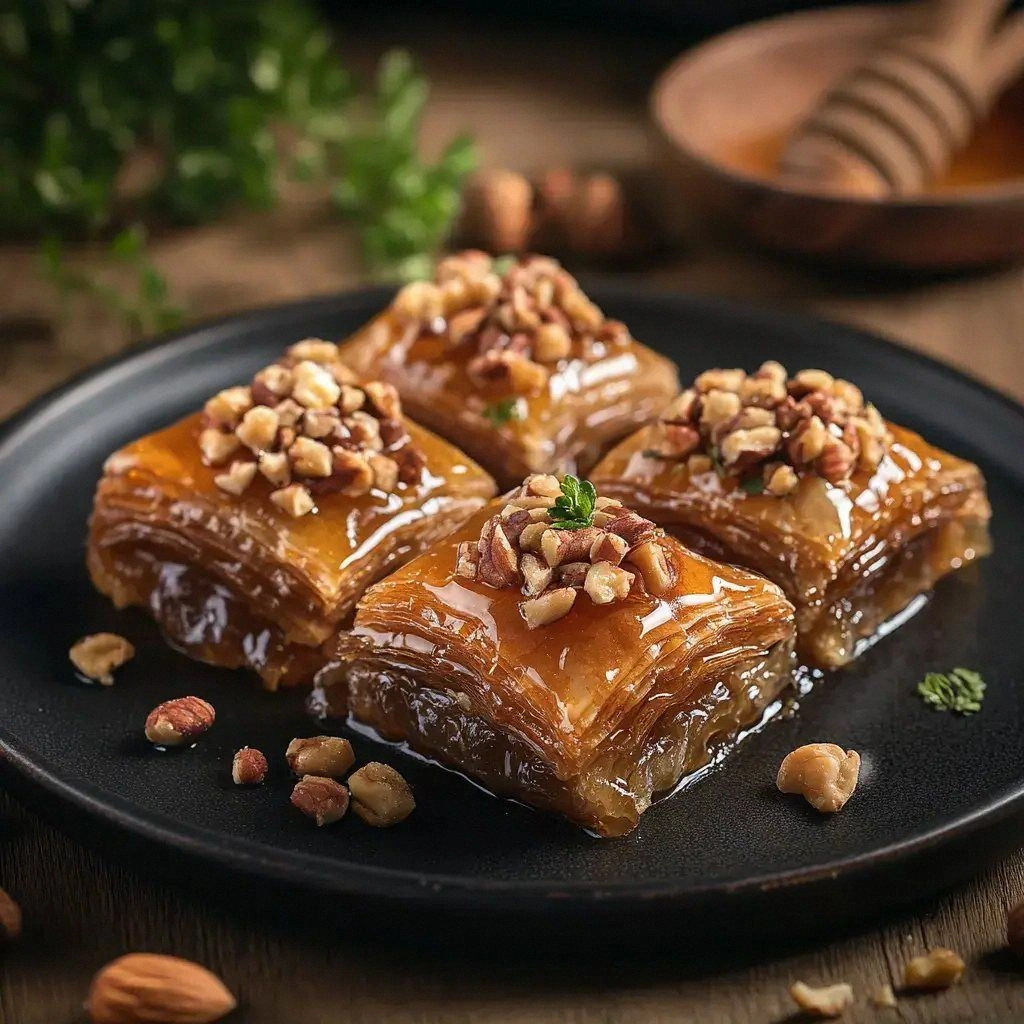
The first bite was a revelation: the crisp, buttery layers of phyllo gave way to a molten honey glaze that hugged every bite like a silky blanket, while the nuts offered a satisfying crunch that echoed in your ears. The honey, sweet but not overpowering, carried a subtle floral undertone that lifted the whole dish, and the cinnamon added a whisper of warmth that danced on the palate. The kitchen smelled like a Mediterranean summer, a mix of toasted flour, honey, and citrus, making every inhale a prelude to the deliciousness to come. The texture was a symphony of crispness and gooeyness, each bite a new experience that kept my spoon poised for the next. The first challenge was to keep the layers from sticking together, but a little butter and a steady hand did the trick. I dared you to taste this and not go back for seconds, because once you do, the temptation is impossible.
I’ll be honest – I ate half the batch before anyone else got a chance to try it, and the kitchen was left with a sticky trail of honey on the counter and a sweet, nutty scent lingering in the air. The first thing that set this version apart from the countless others I’d tried was the balanced ratio of honey to nuts, ensuring that no single flavor dominated. The second was the use of a single, high‑quality butter to keep the phyllo sheets soft and pliable, which prevents cracking and gives the pastry that coveted buttery bite. Third, the honey glaze is infused with lemon zest and a dash of vanilla, giving a subtle brightness that cuts through the richness. Fourth, the nuts are a blend of pistachios, walnuts, and almonds, each adding its own texture and flavor profile, creating a complex bite that’s hard to replicate. Fifth, the baking time is carefully calibrated to achieve a golden, caramelized crust while keeping the interior moist. Sixth, the recipe is designed to be made ahead and reheated, making it ideal for entertaining or a quick dessert after a long day.
Most baklava recipes get this completely wrong – they either over‑bake the pastry until it’s dry or under‑bake it so the honey is still liquid and the layers are soggy. The secret to mastering this dessert is in the precise timing and the right blend of ingredients, and I’m about to share that with you. Picture yourself pulling this out of the oven, the whole kitchen smelling incredible, and a golden, caramelized crust that crackles as you slice it, revealing the flaky layers and the glossy honey glaze. The aroma alone can turn any ordinary evening into a celebration. If you’ve ever struggled with baklava, you’re not alone – and I’ve got the fix that will make your dessert unforgettable. This is hands down the best version you’ll ever make at home.
What Makes This Version Stand Out
- Taste: The honey glaze is balanced with a hint of citrus and vanilla, creating a sweet yet bright flavor that doesn’t overwhelm the nutty undertones.
- Texture: The phyllo layers remain crisp and buttery, while the honey creates a silky glaze that coats each bite like velvet.
- Ingredient Quality: Using fresh, high‑quality nuts and real honey makes a noticeable difference in depth and authenticity.
- Ease of Prep: The recipe requires minimal hands‑on time after the initial assembly, thanks to the buttery coating that prevents sticking.
- Make‑Ahead: The dish can be assembled and refrigerated overnight, allowing the flavors to meld and the pastry to firm up.
- Reheating: A quick bake or a few minutes in a low‑heat oven restores the crispness without drying out the honey.
- Presentation: The final cut reveals a glossy, caramelized surface that looks as impressive as it tastes.
- Versatility: Swap nuts or add spices to create variations that cater to different palates.
Alright, let’s break down exactly what goes into this masterpiece…
Inside the Ingredient List
The Flavor Base
The honey is the star of the show, but it’s not just any honey. Opt for a light, floral variety like clover or acacia, as they provide a clean sweetness that won’t overpower the nuts. Honey also acts as a natural preservative, keeping the baklava moist and flavorful for days. If you’re in a pinch, a 1:1 ratio of honey to sugar can substitute, though the texture will be slightly different.
The lemon zest and juice add a bright counterpoint to the honey’s richness. They also help balance the sweetness by introducing a subtle acidity. A tablespoon of lemon zest is enough to brighten the entire dish without making it tart. If you prefer a more aromatic profile, a few drops of orange blossom water can replace the lemon zest for a floral twist.
The Texture Crew
Phyllo dough is the backbone of baklava, providing that iconic flaky crunch. Use fresh phyllo sheets if possible; they’re easier to handle and don’t crack as easily. When you layer the phyllo, brush each sheet with melted butter or clarified butter to keep them from sticking and to give them a golden finish. The butter also adds a subtle richness that complements the honey.
The nuts are the texture engine, offering crunch, flavor, and visual appeal. A blend of pistachios, walnuts, and almonds gives depth; pistachios bring a buttery flavor, walnuts add earthiness, and almonds provide a subtle crunch. Roughly chop the nuts to ensure they’re evenly distributed and to avoid large chunks that could dominate a single bite. If you’re allergic or just don’t like one type, feel free to swap out entirely for a single nut variety.
The Unexpected Star
Cinnamon is a subtle but essential spice that ties the whole dish together. A teaspoon of ground cinnamon, added to the honey glaze, infuses warmth without being overpowering. Cinnamon also helps to balance the sweetness, adding a hint of spice that keeps the dessert from feeling cloying. If you’re adventurous, a pinch of cardamom or a dash of nutmeg can add an exotic twist.
Water is used in the glaze to create a thin, pourable consistency that coats the baklava evenly. It also helps to prevent the honey from crystallizing during baking. A half cup of warm water, combined with honey, sugar, and spices, creates a glaze that caramelizes beautifully on the surface.
The Final Flourish
Vanilla extract gives the dessert a subtle depth that enhances the honey’s floral notes. One teaspoon is sufficient, as vanilla can quickly become overpowering. A pinch of salt is essential to balance the sweetness and bring out the nut flavors. Salt also helps to break down the sugars in the glaze, creating a smoother, more cohesive finish.
Everything’s prepped? Good. Let’s get into the real action…
The Method — Step by Step
- Preheat your oven to 350°F (175°C) and line a 9x13 inch baking dish with parchment paper. Butter the dish lightly to prevent sticking. This is the moment of truth, where the foundation of your baklava begins to take shape. Don’t rush; a well‑prepped pan ensures a flawless finish.
- Take one sheet of phyllo, brush it with melted butter, and place it in the dish. Repeat this process, layering a sheet at a time, until you have 12 sheets. The butter coating should be thin and even; if it’s too thick, the pastry may become greasy. Watch the layers as they rise; the butter will help them expand slightly, creating that airy texture.
- Sprinkle a thin layer of the chopped nuts over the phyllo. The nuts should be evenly distributed to avoid clumps. Gently press the nuts into the dough so they adhere, but avoid crushing them. This step ensures each bite contains a balanced nut presence.
- Cover the nuts with another sheet of buttered phyllo. Continue layering in the same pattern—phyllo, butter, nuts—until you’ve used all the sheets. The final layer should be a sheet of phyllo brushed with butter, ready to be cut.
- Using a sharp knife, cut the baklava into diamond or square shapes. A clean cut prevents the layers from sticking together. The cuts also allow the honey glaze to seep into each piece, ensuring a uniform flavor.
- In a saucepan, combine honey, sugar, water, lemon zest, lemon juice, cinnamon, and vanilla. Bring the mixture to a gentle simmer, stirring constantly until the sugar dissolves completely. The glaze should be glossy and slightly thickened, ready to coat the pastry.
- Pour the glaze evenly over the cut baklava, ensuring each piece is coated. The glaze should pool slightly in the crevices, creating a glossy, caramelized surface. Let the baklava sit for 10 minutes so the glaze can set slightly before baking.
- Bake the baklava for 30-35 minutes, or until the edges are golden brown and the glaze has caramelized. The aroma should fill the kitchen, signaling that the layers are crisp and the honey is perfectly toasted. Keep an eye on the edges; if they start to brown too quickly, tent the dish with foil.
- Remove the baklava from the oven and let it cool for 10 minutes. This allows the glaze to set firmly, ensuring each bite holds its shape. While it cools, the honey will thicken slightly, creating that delightful sticky finish.
- Once cooled, transfer the baklava to a serving platter. Serve at room temperature or slightly warm for maximum flavor. The final result should be a golden, caramelized masterpiece with layers of crisp phyllo, crunchy nuts, and a glossy honey glaze.
That’s it—you did it. But hold on, I’ve got a few more tricks that will take this to another level, turning an already amazing dessert into an unforgettable experience.
Insider Tricks for Flawless Results
The Temperature Rule Nobody Follows
Many baklava recipes bake at 400°F, which can cause the honey to scorch before the pastry finishes crisping. Baking at 350°F allows the layers to bake evenly while the honey slowly caramelizes. If you prefer a darker crust, you can finish the baklava under the broiler for 1-2 minutes, but watch it closely to avoid burning. This small temperature tweak can make the difference between a good baklava and a great one.
Why Your Nose Knows Best
Before you pull the baklava out of the oven, pause and inhale the aroma. A warm, honeyed scent with a hint of cinnamon signals that the glaze is caramelizing correctly. If it smells too sweet or overly syrupy, let it bake a bit longer. Trusting your nose is a simple, reliable way to ensure the perfect finish.
The 5‑Minute Rest That Changes Everything
After baking, allow the baklava to rest for exactly five minutes before cutting. During this time, the glaze sets into a glossy, slightly sticky coating that holds the layers together. Cutting too soon can cause the pieces to crumble, while waiting too long can make the honey too hard. This brief rest is a simple step that dramatically improves the texture.
The Butter Trick for Crispy Layers
Instead of using plain melted butter, clarify the butter by melting it until the milk solids separate and float to the top. Skim off the solids and use the clear butter to brush the phyllo sheets. Clarified butter has a higher smoke point and imparts a richer flavor without the risk of burning. This trick is especially useful if you’re baking at a slightly higher temperature.
The Honey‑Water Ratio
A common mistake is to use too much water in the glaze, which can make the baklava soggy. Keep the ratio of honey to water at 3:1 to maintain a thick, pourable glaze. If you’re using a very thick honey, you can reduce the water slightly to avoid a runny glaze. This simple ratio adjustment keeps the pastry crisp.
The Final Flourish: Adding a Splash of Rum
For an adult twist, add a tablespoon of dark rum to the honey glaze. The rum adds depth and a subtle warmth that pairs wonderfully with the nuts. It also helps to caramelize the glaze more evenly. This is a quick way to elevate the dessert for a special occasion.
Creative Twists and Variations
This recipe is a playground. Here are some of my favorite ways to switch things up:
Nutless Nirvana
Replace the nuts with finely chopped dried apricots or figs for a chewy, sweet twist. The dried fruit adds natural sweetness and a different texture, making it ideal for those who dislike nuts or have allergies.
Spiced Cinnamon Delight
Add a pinch of ground cloves and allspice to the glaze for a warm, aromatic flavor profile. This version is perfect for fall gatherings, evoking the scent of freshly baked pies.
Chocolate‑Covered Baklava
After baking, drizzle melted dark chocolate over the cooled baklava. The chocolate adds a rich, bittersweet contrast that pairs beautifully with the honey. Let the chocolate set before serving.
Coconut Crunch
Swap half the nuts for toasted shredded coconut. The coconut adds a tropical flavor and a delightful chew. Pair it with a splash of coconut milk in the glaze for a full coconut experience.
Almond‑Lemon Twist
Use only almonds and add a teaspoon of lemon zest to the glaze. The bright lemon cuts through the almond richness, creating a fresh, zesty dessert that’s perfect for spring.
Vegan Baklava
Replace butter with coconut oil and use a plant‑based honey substitute. The result is a completely vegan dessert that still delivers the same caramelized finish and nutty crunch.
Storing and Bringing It Back to Life
Fridge Storage
Store baklava in an airtight container at room temperature for up to 5 days. The layers will stay crisp, and the honey glaze will retain its shine. If you notice the glaze drying, lightly mist the top with water and re‑seal the container.
Freezer Friendly
Wrap the baklava tightly in plastic wrap, then place it in a freezer bag. It can be frozen for up to 2 months. Thaw at room temperature before serving; the honey will re‑soften, restoring the original texture.
Best Reheating Method
Reheat frozen or chilled baklava in a 300°F oven for 10 minutes, or until the edges are warm. Add a splash of water to the dish before reheating to create steam, which keeps the honey from drying out. Let it sit for a minute after removing from the oven; the steam will finish caramelizing the glaze.